Hello! I Hope You Dont Mind Me Asking, But How Do You Draw Those Amazing Black And White Comics? (Coffee
Hello! I hope you dont mind me asking, but how do you draw those amazing black and white comics? (Coffee and The Goddess comics come to mind!) I love the way you do them and would love to know the process you go thru!
this is a pretty broad question and im guessing/hoping you meant “how do you color in black and white in your comics” so have a few random tips about values and paneling and stuff i guess


thank you
More Posts from Basket-of-references and Others
How to avoid White Room Syndrome
by Writerthreads on Instagram
A common problem writers face is "white room syndrome"—when scenes feel like they’re happening in an empty white room. To avoid this, it's important to describe settings in a way that makes them feel real and alive, without overloading readers with too much detail. Here are a few tips below to help!
Focus on a few key details
You don’t need to describe everything in the scene—just pick a couple of specific, memorable details to bring the setting to life. Maybe it’s the creaky floorboards in an old house, the musty smell of a forgotten attic, or the soft hum of a refrigerator in a small kitchen. These little details help anchor the scene and give readers something to picture, without dragging the action with heaps of descriptions.
Engage the senses
Instead of just focusing on what characters can see, try to incorporate all five senses—what do they hear, smell, feel, or even taste? Describe the smell of fresh bread from a nearby bakery, or the damp chill of a foggy morning. This adds a lot of depth and make the location feel more real and imaginable.
Mix descriptions with actions
Have characters interact with the environment. How do your characters move through the space? Are they brushing their hands over a dusty bookshelf, shuffling through fallen leaves, or squeezing through a crowded subway car? Instead of dumping a paragraph of description, mix it in with the action or dialogue.
Use the setting to reflect a mood or theme
Sometimes, the setting can do more than just provide a backdrop—it can reinforce the mood of a scene or even reflect a theme in the story. A stormy night might enhance tension, while a warm, sunny day might highlight a moment of peace. The environment can add an extra layer to what’s happening symbolically.
Here's an example of writing a description that hopefully feels alive and realistic, without dragging the action:
The bookstore was tucked between two brick buildings, its faded sign creaking with every gust of wind. Inside, the air was thick with the scent of worn paper and dust, mingling with the faint aroma of freshly brewed coffee from a corner café down the street. The wooden floorboards groaned as Ella wandered between the shelves, her fingertips brushing the spines of forgotten novels. Somewhere in the back, the soft sound of jazz crackled from an ancient radio.
Hope these tips help in your writing!
Attention anyone who needs hairstyle references
I want to introduce all of you to this amazing place called the ukhairdressers style gallery.
It’s basically a massive database full of high-quality images of different hairstyles. I mean, look at all the options in that sidebar (and part of it’s cut off):

In total they have 976 pages of hairstyles with about 17 styles each, that’s about 16592 hairstyles to look at.
Look at all the stuff they’ve got! Long hair:

Short hair:

Straight hair:

Curly hair:

Afro hair:

Men’s hair:

Hair on older models:

Extra-fancy hair:

Even crazy avant-garde hair:

So if you need help with designing a character or you just want to practice drawing hair, this is a fantastic resource.
A couple art tips I wish someone had told me when I was starting out:
FOR ALL AGES BECAUSE YOU CAN START ART WHENEVER YOU WANT AND YOU DON'T HAVE TO BE YOUNG
If you want to draw people then one of the best ways to improve is to become a little narcissistic and repeatedly draw yourself. You are someone that you'll always have reference to and don't need to feel bad about lacking skill when drawing.
If you want to draw in a cartoon or anime style then first draw realistically so you can form a better understanding of proportions, movement, and perspective. This may not be true for or helpful to everyone but I know many that it has been helpful for.
Quit looking up poses on the internet and model your own poses, you coward! You can choose the angle of the camera and the exact position you want each piece of your body in!
Don't fully render an image in your mind. Think of one or two elements of the piece and let the rest flow for best results. Not many people can replicate what was in their head, you'll be less upset if you keep your ideas and inspiration vague.
Digital Painting: tips for beginners
Heyo! I got asked if I could make a tutorial on digital painting so I’m gonna throw together some advice meant for people who are starting out and want to figure out exactly how this stuff all works. Because it’s hard! What I hope to accomplish here is to make painting more approachable for you.
Firstly, I have put together something like this before, so for archival purposes here it is: http://holy-quinity.tumblr.com/post/89594801811/i-dont-know-how-much-of-this-kind-of-thing-you
For those of you who don’t wanna bother reading that, here are the main points:
1. Learn your program and its tools, from brush properties to layer styles. And I mean learn them. Make a cheatsheet that shows you exactly what each button and scale does, both in isolation and in conjunction with other buttons and scales. Refer to this as much as possible until it is intuitive. The end goal is to know exactly what to do to your brush’s settings to achieve a given effect.
2. It’s perfectly okay to use your sketches, linearts, and other forms of line in your paintings. They can help guide the form and there’s no need to make something fully “lineless”! I never make things “lineless.”
3. Study other people’s art and try to think how they could have possibly achieved the effects they did. You can learn a lot just by observing and mentally recreating the process stroke by stroke—muscle memory is a powerful tool at your disposal. This becomes easier to do once you’ve started doing item 1 above.
OKAY!
So where the heck do you even begin?
What I’m gonna do is try to make digital painting as approachable as possible for someone who’s never really done it. The main idea here is that digital painting is just like real painting. So if you’ve ever done real painting, you already kinda know what’s coming.
I’m gonna assume you know the basics of digital art: you can sketch, line those sketches using layers and opacity changes, and fill the lines with color, maybe even opting to add some shading…and you’ll get something like this:

You know, cell-shaded, or maybe the shading’s blended, but you’ve still obviously a line drawing with color put down on layers beneath the lines.
The next intuitive step is to try going “lineless”…but when you remove the lines you get this:

idk about you but I’m laughing at how stupid this looks
When I was first teaching myself to paint digitally, I didn’t really know how to deal with this. Without lines, the form of the subject vanished or became a mess like the above. Even if I was meticulous and careful about placing down the color such that without the lines layer turned on, the shapes fit together, it didn’t look quite right. There’d be gaps, I wouldn’t know how to incorporate the subject into a background, the contrast wouldn’t be high enough, or it’d just in general look too much like a screenshot from Super Mario 64.
Painting requires a different process than the above. You’ll have to let go of some of your habits and conventions. Such as staying in the lines. Such as fully relying on the lines. Like, I love my lines, I love my sketches—but in painting, they are guides for form, and are not the form itself. So let me go through how I approach a given painting:

My painting process starts with a sketch (here a boring portrait for demonstrative purposes). I make the opacity of the sketch layer something like 30%, and then throw down my base colors on a new layer underneath. I’m not being meticulous about the sketch itself, because again it’s just meant to guide my placement of color. I’m also not meticulous about my placement of the color.
We’re essentially sketching with color. Because ultimately what we want is for the color to take on the form and shapes conveyed by the sketch.
There’s a lot going into this about how to use value, how to shade, how to use color, etc. that I’m kinda skipping over because it takes a lot of time to explain…but there are hundreds of tutorials out there on those topics so please, google around! I found some helpful tuts that way when I was starting out.
Something I find v useful is to keep selecting colors that already exist in your image for shading and hue adjustment. This is why I start with really blendy, low-opacity brushes when throwing down color on top of the background. I can then select colors within there that are a mix of the two.
For instance, I’ll select the color of the lines here:

…and use that to shade:

And maybe I’ll select one of the darker shades around his eye, but not the darkest, to make the shading a smoother gradient…and so on.
What I do in general at this point is go over the shapes and lines of the sketch. Such that I can turn off the sketch layer and see this:

I’m replacing the lines with shading and value. I’ll continue to do this as I keep adding color.

This is all super loose. I am not dedicated to any particular stroke. I just want the colors and shading and light source to be right. I’ll use overlay layers to boost contrast or add a hue.
Here are other examples where I used this process:


I am constantly changing brushes and brush settings as I paint. It really depends on what effect I want where. I am also constantly selecting new colors and applying or blending those in. I don’t believe in having some uniformly applied base color and then shading with only one or two…that’s what I’d do if I was cell-shading like the first drawing I showed you here, but painting should be about messing with color and opacity and blending to make millions of hues!
Good rule of thumb: Hard, opaque brushes for applying color. Soft, dilute brushes for blending colors. Sometimes hard, dilute brushes can make some cool blending effects! I personally prefer harder edges on my shading so that’s a brush I use often.
This is getting a bit long so I’m gonna split it up into multiple parts, but really what I want you to get from this is:
1. learn the tools at your disposal until they are intuitive
2. sketch and line are guides for form, not the form itself
3. rather, hue and value will produce the form
And of course, practice makes perfect!!! Every drawing you make, every painting you make, will bring you one step closer to the artist you want to be, and thus every drawing and every painting, no matter what, is a success.

These are taken directly from the concept art. May not be the same as what was used in the shows.
I will edit post with hexcodes.

So you might be saying: Lion why a guide on drawing black people? Well young blood it’s because a lot of people cant…seem…to draw…black people..Amazing I know.

Racist (caricatures) portrayals of black people have been around forever, and to this day people can’t seem to draw black people like they are human. If your artwork resembles any of the above even remotely your artwork is racist and offensive. If you try to excuse that as a stylistic choice you’re not only a terrible artist, but racist too!!! Congrats.

Whitewashing is also a problem. A lot of people refuse to draw black features on canonly black characters. While this example isn’t colored, lightening the skin-tone of a character is also considered whitewashing. So lets start with features!

Now all black people have different noses thats a no-brainer, but black noses tend to have flatter bridges, and wider nostrils. Please stay from triangular anime noses and small button noses. Your drawings should not depict black people with abnormally large noses. (Especially if you do not draw other characters this way)

If you feel like the way you draw lips on black characters is offensive or resembles a caricature,it probably does and you should change it. ABSOLUTELY AVOID PLACING LIPS AT THE BOTTOM OF THE FACE.

Hair is so diverse! Please get used to drawing braids, locs,kinks and coils! If you can learn to draw ringlets and long waves you can learn how to draw black hairstyles.

Add clips! Learn how to draw baby-hairs and never be afraid to add color Pinterest and Google are free my dudes! Also try using square brushes for blocking in coils.
OK THAT’S ALL YOU GUYS

Okay guys, here's the best drawing advice I can possibly give to someone struggling to find their "style" or is just a beginner in general. Now when I say this you'll probably think it sounds overly simple and stupid as shit, but please trust me on this.
Take your paper, take your pencil, a vague idea of what you want to draw, and just go fucking ham. Do not sit there forever slowly sketching and erasing every 30 seconds. Do not waste time second-guessing yourself. Draw something, and if you think it looks like shit, draw it again, slightly differently. Again, I repeat, don't take your time with this. Just go for it and don't stop. Now, that second drawing might still look like shit, but I bet you it's slightly better. Keep doing this. Whatever you liked about the last drawing, stick with it. Separate the aspects you like from the aspects you don't.
Now, every artist learns differently, but for me and many others, this simple trick works wonders, 'cause guess what guys, focusing too much on your little mistakes is what's holding you back. So stop it. I'll reword it one last time just to make sure you get it through your head. When you're just starting out, trying to find your groove,
don't 👏 overanalyze 👏 your 👏 mistakes! 👏


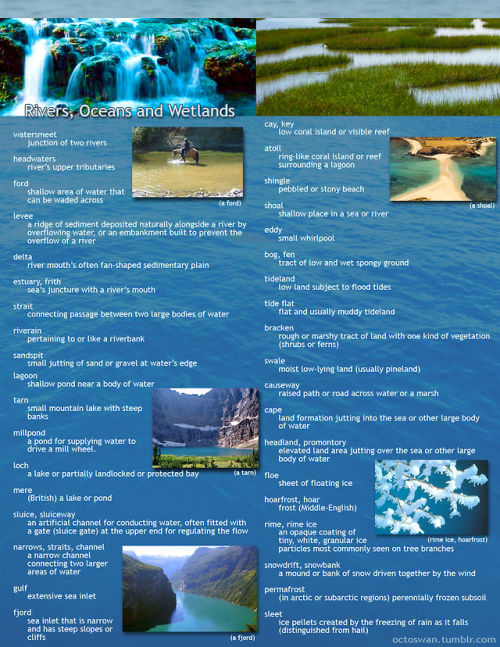
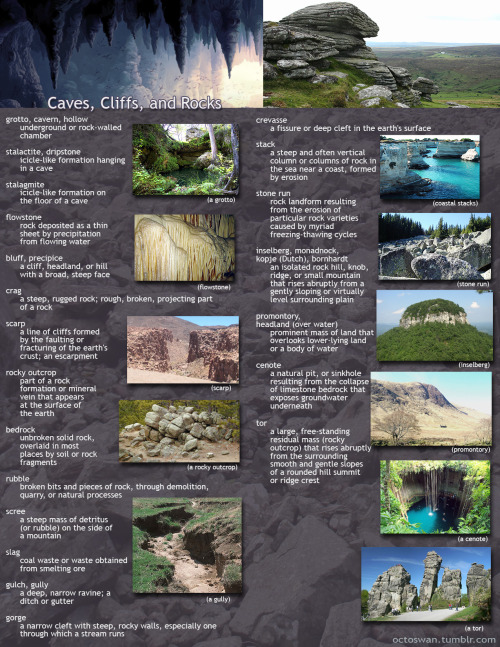
I made these as a way to compile all the geographical vocabulary that I thought was useful and interesting for writers. Some descriptors share categories, and some are simplified, but for the most part everything is in its proper place. Not all the words are as useable as others, and some might take tricky wording to pull off, but I hope these prove useful to all you writers out there!
(save the images to zoom in on the pics)
Art Help

I redid this list because broken links 💀
General Tips
Stretch your fingers and hands
Art is for fun
Never too late to start/improve
Using a tablet
Editing software: pictures & video
Moodboard resources
Comic pacing
Watercolor
Coloring
Color Theory (not children's hospital)
Resources: coloring things a different color
Gold
Dark Skin undertones
Dark Skin in pastel art
POC Blush tones
Eyes colors
Human Anatomy
POSE REFERENCES
Wizard Battle poses
Shoulders
Tips for practicing anatomy
Proportional Limbs
Skeletons
Hair Directions
Afro, 4C hair
Clothing
Long skirts
Traditional Chinese Hanfu (clothing reference)
CLOTHING REFERENCE
Sewing information
Animals
Horse -> Dragon
Snouts: dogs, cats, wolves, fox
Foot, paw, hoof
More
Drawing references sources
Art tutorial Masterlist
Another art tutorial Masterlist
Inspiration: father recreates son's art
Inspiration: Lights
ART BOOKS
Plants/flowers: North America, Hawaii, Patagonia
12 Red Herrings to Keep Your Readers Distracted
I’ve seen mystery/thriller authors use the same handful of red herrings too many times to count. So here are some (hopefully not as common) red herrings for your writing.
1. The Unreliable Narrator's Bias
Your narrator can play favourites and scheme and twist the way your readers interpret the story. Use this to your advantage! A character portrayed as untrustworthy can really be someone innocent the narrator framed, vice versa.
2. The Loyal Traitor
A character with a history of betrayal or questionable loyalty is an obvious suspect. They did it once, they could do it again, right? Wrong! They’ve actually changed and the real traitor is someone you trusted.
3. The Conflicted Expert
An expert—like a detective, scientist, or historian—analyses a piece of evidence. They’re ultimately wrong, either due to bias, missing data, or pressure to provide quick answers.
4. The Overly Competent Ally
You know that one sidekick or ally who’s somehow always ahead of the curve? They’re just really knowledgeable, your characters know this, but it makes it hard to trust them. Perfection is suspicious! But in this case, they’re actually just perfect.
5. The Misleading Emotional Clue
Maybe one of your characters is seen crying, angry, or suspiciously happy after xyz event. Characters suspect them, but turns out they’re just having a personal issue. (People have lives outside of yours MC smh). Or it could be a cover-up.
6. A Misleading Alibi
At first this character’s alibi seems perfect but once the protag digs into it, it has a major hole/lie. Maybe they were in a different location or the person they claimed to be with was out of town.
7. The Odd Pattern
Have a seemingly significant pattern—symbols left at crime scenes, items stolen in a specific order, crimes on specific dates. Then make it deliberately planted to mislead.
8. The Misinterpreted Relationship
A character was secretly close to a victim/suspect, making them a suspect. Turns out they were hiding a completely unrelated secret; an affair, hidden family connection, etc.
9. A Forgotten Grudge
Create a grudge or past feud and use it to cast suspicion on an innocent character. Introducing an aspect of their past also helps flesh out their character and dynamics as a group + plant distrust.
10. The Faked Death
Luke Castellan, need I say more (I will)? A supposedly innocent character dies, but turns out they faked it and were never a victim in the first place. They just needed to be out of the picture.
11. The Mistaken Eavesdropper
A character overhears a threat, argument, etc. They suspect B based on this convo, but turns out they just came to a false conclusion. (Or did they?)
12. The Forgetful Alibi
Someone confesses to hearing/seeing a clue, but turns out they were mistaken. Maybe they thought they heard a certain ringtone, or saw xyz which C always wears, but their memory was faulty or influenced by stress.
Looking For More Writing Tips And Tricks?
Check out the rest of Quillology with Haya; a blog dedicated to writing and publishing tips for authors!
Instagram Tiktok
-
 roxasinumiku reblogged this · 1 week ago
 -
roxasinumiku liked this · 1 week ago
-
 secondhand-lions liked this · 2 weeks ago
 -
 wallfernz reblogged this · 2 weeks ago
 -
 chimchiri liked this · 2 weeks ago
 -
 acosmicfox liked this · 2 weeks ago
 -
 colorfuleggvoidnickel liked this · 3 weeks ago
 -
 ayain77 liked this · 3 weeks ago
 -
 annoyinglyvague liked this · 3 weeks ago
 -
 tenkasen liked this · 3 weeks ago
 -
 scribblurri reblogged this · 3 weeks ago
 -
 sr-8eep5 liked this · 1 month ago
 -
 renzanix liked this · 1 month ago
 -
 nocturnal-nexu liked this · 1 month ago
 -
 weirdweeb83 liked this · 1 month ago
 -
 adventuretolkienlover reblogged this · 1 month ago
 -
 biorusted reblogged this · 1 month ago
 -
 rockhold liked this · 1 month ago
 -
 aster-daydream404 liked this · 1 month ago
 -
 tmblrissstupid liked this · 1 month ago
 -
 ninjagokata liked this · 1 month ago
 -
 ratkatbat liked this · 1 month ago
 -
 cookiejar614 reblogged this · 1 month ago
 -
cookiejar614 liked this · 1 month ago
-
 grubgirl413 liked this · 2 months ago
 -
 scandiumcomplex reblogged this · 2 months ago
 -
 kaletalecowboy reblogged this · 2 months ago
 -
kaletalecowboy liked this · 2 months ago
-
 artking-4 reblogged this · 2 months ago
 -
 tele-phoneline liked this · 2 months ago
 -
 generalfandomsofthefreak liked this · 2 months ago
 -
 selkiesongss liked this · 2 months ago
 -
 nightworktobegin reblogged this · 2 months ago
 -
 illdragyoudownwithme reblogged this · 2 months ago
 -
 worldsspookiest liked this · 2 months ago
 -
 sable-bracelet liked this · 2 months ago
 -
 great-art-and-a-purple-tongue reblogged this · 2 months ago
 -
great-art-and-a-purple-tongue liked this · 2 months ago
-
 jaigrefs reblogged this · 2 months ago
 -
 mackerelllll liked this · 2 months ago
 -
 kyonarra liked this · 3 months ago
 -
 cupofkhaos liked this · 3 months ago
 -
 zombiefrancis reblogged this · 3 months ago
 -
 potatoes-artshack liked this · 3 months ago
 -
 intheloop22 liked this · 3 months ago
 -
 coolspork reblogged this · 3 months ago
 -
coolspork liked this · 3 months ago
