Your personal Tumblr journey starts here
Art Help - Blog Posts
HELP I LEFT TO GET A DRINK AND MY 3D MODEL TURNED INTO A MELTING LEMON WHAT HAPPENED


HELP DOES ANYONE KNOW HOW TO FIX IT?????

Here's another Nightwing, I actually drew this one before the other one I posted, but I don't really like this one, I think something about how I colored the skin is funky. Any suggestions?

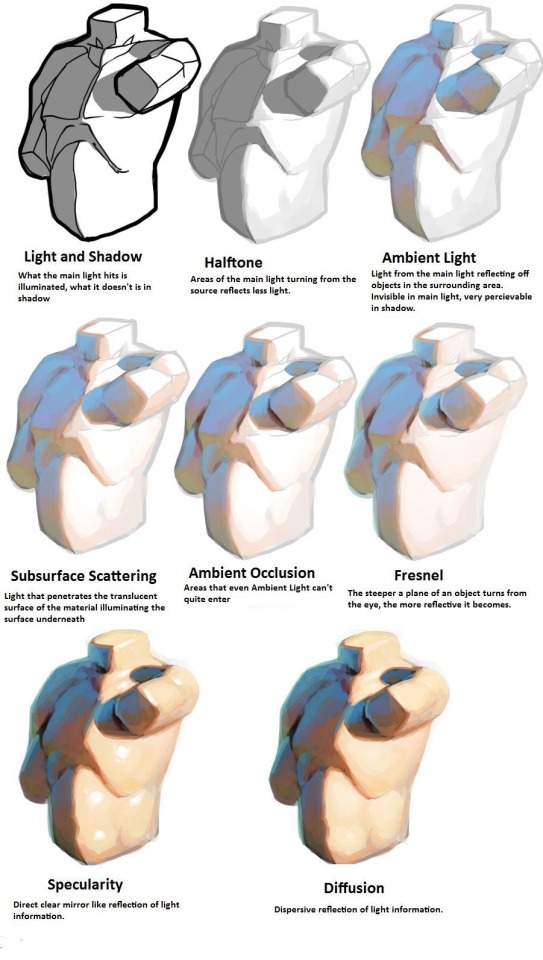

I am so serious when I say if you want to learn about light, you NEED to at least look at modeseven’s tutorials. even if you’re not pursuing a painterly style, this is all essential theory that can be easily adapted to different coloring styles. notice how none of these ever say ‘light with these colors and shade with these colors’? notice how this is teaching how light works on a mechanical level, and reminding the audience to adjust the actual colors they choose by context? THAT is good advice.
(if you’re thinking ‘wow I want to study more of this persons art!’ I encourage you to do so, but proceed with the knowledge that modeseven draws pretty much exclusively weird as hell kink art. sometimes wisdom comes from horny places)
OKAY CHAT IM TOO LAZY TO FINISH MY WIPS GIMME CHARACTERS‼️‼️‼️‼️ (can be any fandom)

So, I’ve gotten really into Linked Universe (which is funny cause i’ve never once consumed any of the actual medias) and while reading fanfic I found out that apparently Legend has a suit that turns him into a mermaid? So I ran with it.
Ignore how messy the sketch is and tell me which one of the two looks the best, plz. My sister is zero help


Also here’s the actual mermaid suit💀

And Legend’s character sheets for anyone that might not know what i’m talking about


Hey, if anyone has experience with working with animation studios or working in animation in general, what is the one most commonly used or which is preferred?

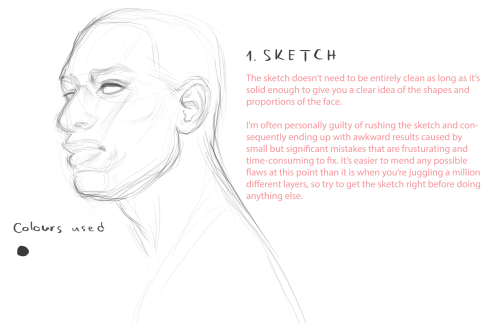

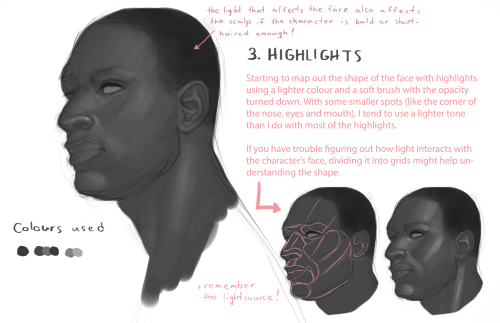

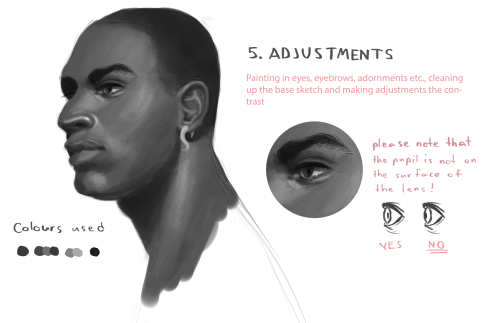


A few people have asked about this recently so I tried to break down my method of painting faces to the best of my ability. I personally like to use gritty chalky brushes, and this particular painting was mainly done with this brush by Mark Winters.
hi bear, remember when you made post about horses hooves being a toe? im drawing a centaur rn and remembering that helped me
so i had struggles with how certain horse leg position would look like and so i brought my finder up and looked at it, and turned out to be kinds similar you just need to add shoulder joint in end
hold on ill doodle examples

anyway thank you for horse toe

Oh heck that cursed thing actually seems pretty useful
ClipDrop Relight allows you to change the lighting of images (including artworks) for free with their AI lighting tool
This could be super useful for artists if you want to play around with potential lighting/colours! I tested it out a bit and it seems to work with both portraits and sceneries, however it doesn't look like it works with flat sketches. Still really impressive though!

An Introductory Timeline of Western Women's Fashion
I think a good place to start to get into dress history is general overview of the whole timeline. Understanding especially how the silhouettes change is really important ground knowledge to build the rest of the information on.
I'll start the timeline from Middle Ages and go till the first world war. I'll focus on upper class England/French sector, so keep in mind that before 17th century there were huge regional differences in fashion inside Europe and class differences too. There is a lot variance, changes and nuance inside any century and decade I'm about to discuss, but I'll try to keep this short and introductory and very simplified. I used a very scientific method of basically what makes most sense to me to divide the periods. I've made sketches what I would consider to be the basic silhouette of the period stripped mostly out of the detail and then I give couple of primary source examples.
12th century (Middle Ages)

Dress was simple one or more tunics over a chemise. They were overly long for upper classes, made out of straight lines. There were loose tunics often worn over another tunic, and tunics with laced bodice called biaut. In France bliaut sleeves often widened from the elbow, in England they often widened in frists.
13th century (Middle Ages)

Clothing was mostly very similar as in the previous century, though bliaut was mostly gone and new popular style was a loose sleeves surcoat.
14th century (Middle Ages)

Tailoring basically revolutionized clothing production, since clothes weren't made out of rectangles anymore and could be better made to fit form. Also functional buttons and lacing was popularized resulting in very fitted styles. The underlayer tunic, kirtle, became a fitted supporting layer.
15th century (Middle Ages)

Improvements in weaving technology and trade and growing prosperity in Europe showed in clothing as excess of fabric and variety of trends. Houppelande, a loose A-lined overdress lined with fur and fastened with a wide belt under breasts, became a very popular clothing item, and in later decades developed into the iconic Burgundian dress (the red dress). Fitted overdress continued to be popular alongside the warmer houppelandes.
1500s-1550s (Tudor period)

In the renaissance era clothing became increasingly structured and elaborate. The bodice was heavily boned and the skirt was also structured.
1560s-1610s (Elizabethan Era)

Both structuring and elaborate decoration reach it's peak during Queen Elizabeth's reign. She became the defining fashion icon of the late renaissance.
1620s-1670s (Baroque)

In baroque era the bodice was still heavily structured, but more curved than the conical Elizabethan bodice. Otherwise though structuring was replaces with dramatic excess of fabric.
1680s-1710s (Baroque)

In the late 17th century there was a huge shift in the clothing industry as mantua, a loose open robe inspired by Japanese kimono, came to dominate fashion. Rigid bodice was replaces by structured under layer, stays. Stays brought back the conical silhouette of Elizabethan era.
1720s-1780s (Rococo)

Mantua developed into the iconic Rococo dress in France, robe à la francaise (first example picture), and in England robe à la anglaise with closed bodice. Rococo fashion was characterized by the wide silhouette of the skirt.

Since Tumblr won't accept more than 10 pictures per a post I'll have to continue in a reblog. So to be continued!
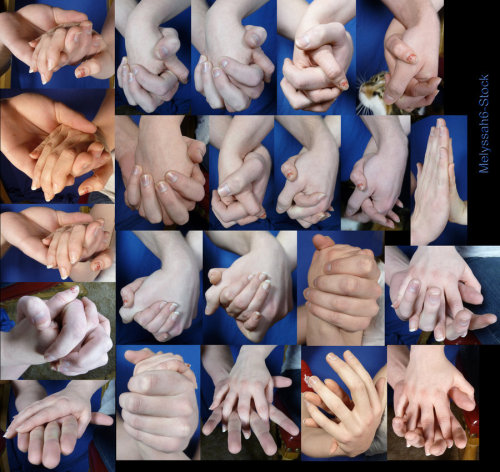
Is there a website to look up models or people to draw, with gender, ethnicity, and age filters. (if possible)?
For example if a wanted to make a cartoon character realistic and use a real person for reference or to edit the photo to look like them?
I’ve been just googling white 20s male, black female 40s etc. (can’t find any good references for kids either) and been sifting through the results.


How to draw Dreadlocs!
See Part One: Rendering Natural Black Hair Coming Up Next: VOTE by sending to my Ask box! (Until March 1st). Feel free to suggest any style or subject matter within drawing natural hair!
Questions? Comments? Tell me all about it!
Please help me concentrate more on this awesome tutorial series by subscribing to my Patreon!


Random mansion generator


The Procgen Mansion Generator produces large three-dee dwellings to toy with your imagination, offering various architectural styles and other options. Each mansion even comes with floorplans:
https://boingboing.net/2019/07/12/random-mansion-generator.html
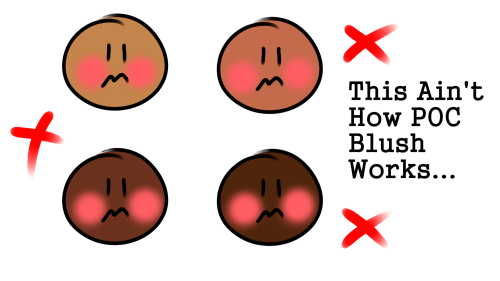
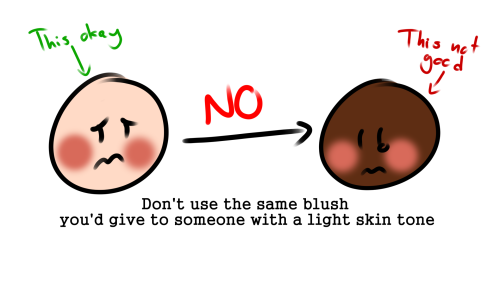
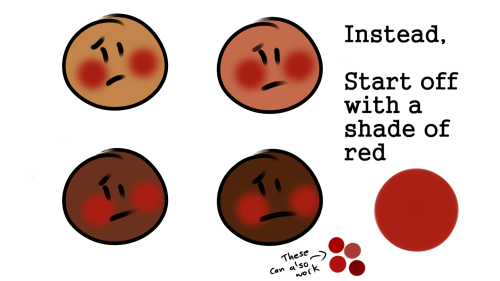
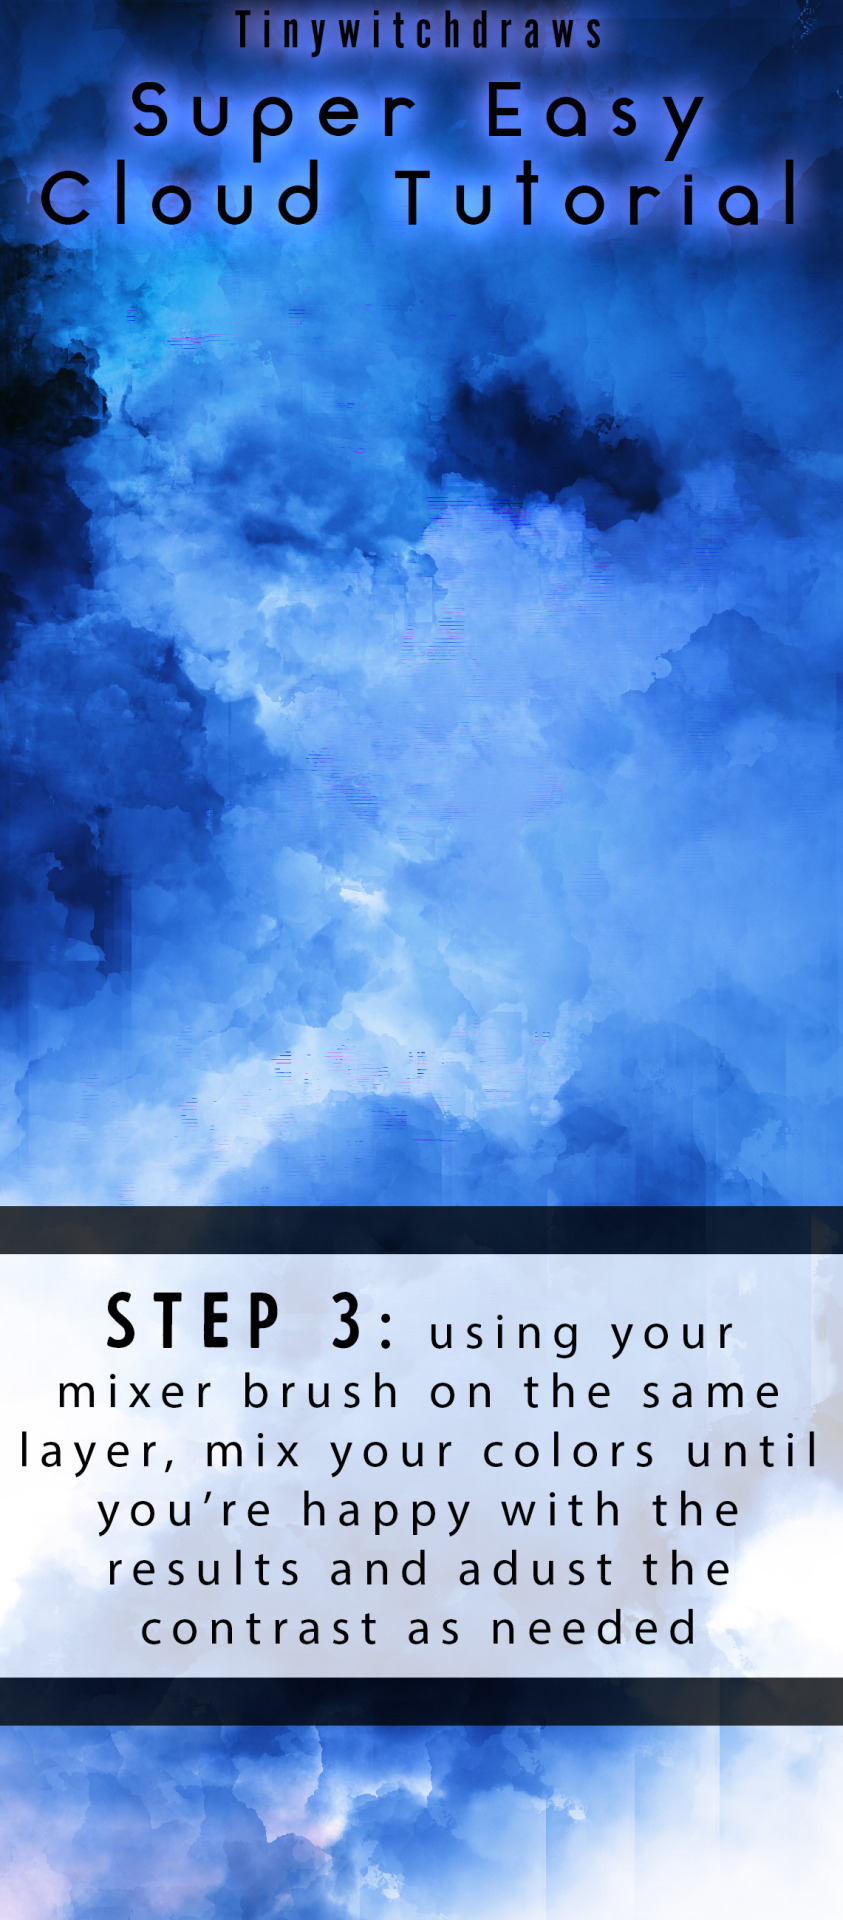
shading colour tips
hey yall its me the Art Mom™ to help you shade pretty
rule 1: DO NOT SHADE WITH BLACK. EVER. IT NEVER LOOKS GOOD.
red- shade with a slightly darker shade of purple
orange- slightly darker and more saturated shade of red
yellow- i think like..a peach could work but make it a really light peach
green- shade with darker and less saturated shade of blue or teal
blue- shade with purple
purple- a shade thats darker than the purple you’re using and maybe a little pink (MAYBE blue)
pink- darker shade of red
white- a really light lavender or blue..or i guess any really light colour??
black- okay listen dont use pure black to colour anything unless you want to leave it with flat colours because you cant really shade black lol
grey- a slightly darker shade of purple or blue (less saturated)
brown- slightly darker and less saturated shade of purple or red
aaaaand thats all i got lol. let me know if there is anything i should add to this list!!


Here’s a Gif of the brush in action so you can see what it looks like:

You can find the brushes here! 💕💕💕
I will also be posting an extra notes pack for $5 that will cover:
-how to add stars and effects easily
-how to adjust your image easily
You will be able to find those notes here!
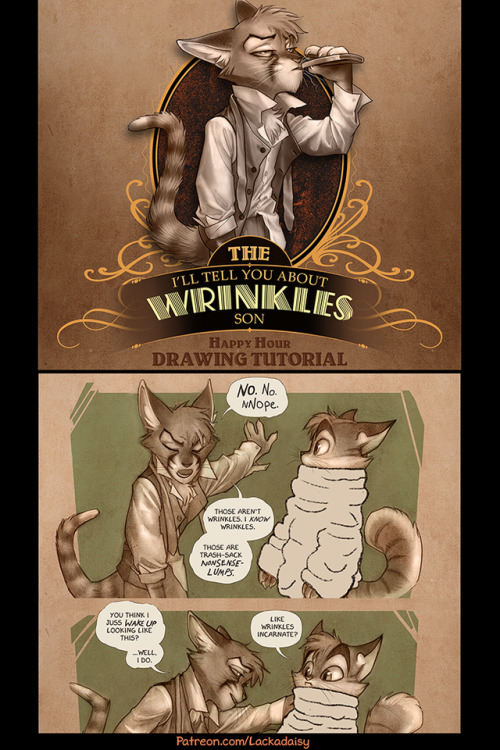
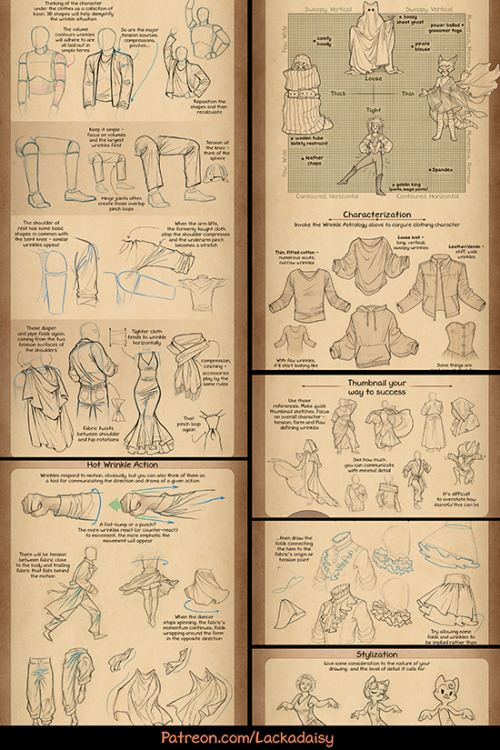
Drawing Wrinkles
I made a tutorial-thing about drawing clothing wrinkles - something I’ve had a few requests for. For all the banality of wrinkles, they’re an expansive topic. Anyway, these are some previews. The full tutorial is available to all $1+ Patreon supporters. You can find it here!
apparently ppl don’t know about waifu2x??? despite its… concerning name it’s literally the most convenient website i’ve ever come across as an artist
it allows you to resize artwork without it becoming pixellated. this is a MASSIVE help if you, for example, make lineart too small or something. it works best with things that 1. have no textures 2. have smooth lines 3. have cel shading, but it still works really damn well for things that don’t fit that profile
here’s an example:

normal size

2x in paint

2x in waifu2x
so like, there’s that. go wild
SONIC POSING NOTES!!!!! !!

Just gonna repost this image because it is relevent. Once you got your stick man pose you can add those shapes on top.

Anyways, more notes, this time on the base shapes.


And that's all that came to mind. I'm working on an expession one too, they've been pretty fun to make.

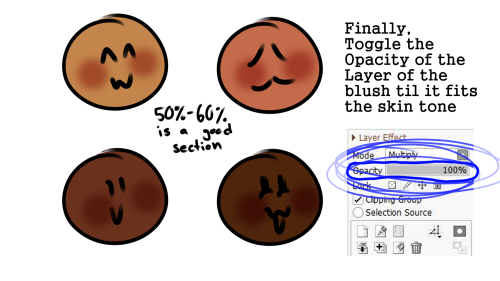
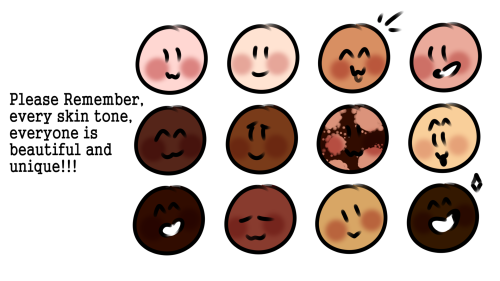
So you might be saying: Lion why a guide on drawing black people? Well young blood it’s because a lot of people cant…seem…to draw…black people..Amazing I know.

Racist (caricatures) portrayals of black people have been around forever, and to this day people can’t seem to draw black people like they are human. If your artwork resembles any of the above even remotely your artwork is racist and offensive. If you try to excuse that as a stylistic choice you’re not only a terrible artist, but racist too!!! Congrats.

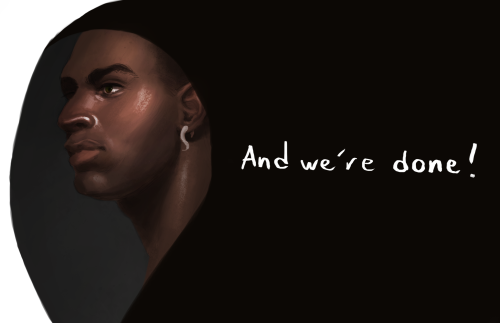
Whitewashing is also a problem. A lot of people refuse to draw black features on canonly black characters. While this example isn’t colored, lightening the skin-tone of a character is also considered whitewashing. So lets start with features!

Now all black people have different noses thats a no-brainer, but black noses tend to have flatter bridges, and wider nostrils. Please stay from triangular anime noses and small button noses. Your drawings should not depict black people with abnormally large noses. (Especially if you do not draw other characters this way)

If you feel like the way you draw lips on black characters is offensive or resembles a caricature,it probably does and you should change it. ABSOLUTELY AVOID PLACING LIPS AT THE BOTTOM OF THE FACE.

Hair is so diverse! Please get used to drawing braids, locs,kinks and coils! If you can learn to draw ringlets and long waves you can learn how to draw black hairstyles.

Add clips! Learn how to draw baby-hairs and never be afraid to add color Pinterest and Google are free my dudes! Also try using square brushes for blocking in coils.
OK THAT’S ALL YOU GUYS

Pwes gip me coloring advice o Master🙏
Color theory.
You want colors that look good with each other? Try complimentary colors, analogous colors, tri- something and all the other cool ones!


Of course, there's MANY different interpretations about how people see color, so the most important advice of all, DONT BE AFRAID TO EXPERIMENT!!! :D
Anybody got tips on how to draw braids and micro braids for a white girl?
someone tell me what needs to be changed before i get too into this


a thing i only recently realized i knew abt character design that isnt just common sense apparently:
do not start ur character design by doing a full, refined turnaround/model sheet.
like. everyone in my childrens book il class is fuckin doing this even though most of them are illustration majors and its a huge mistake (our prof literally warned them against this, and YET)
any time you design a character, start by not caring. by just doing what feels right. dont settle on the first thing; play around. and then draw your character a shitload of times before u start a ref sheet
dont finish anything, just. do super fast sketches of them over and over and over. fill up a page or two. as you draw them theyll evolve. that will happen whether your sketch it out at the beginning or jump right into a final draft, and lemme tell u, u do NOT want ur character evolving and changing AFTER ur final draft. u want to get that out of the way early so u can get a decently consistent finished product
then when you go to do your model sheet you will already be able to keep your character on model without it bc youve drawn them a shitload of times. then it wont be “struggling to draw the character the same every time” itll just be “this is what the character looks like and i could draw them with my eyes closed bc of muscle memory”
dont just jump in and be like “shit i gotta have this full complex polished thing right out of the gate!” like. in the beginning, Do Not Work Hard. play. play a lot. and THEN do a refined drawing. your refined drawing will look way better, too, bc by then youll be completely comfortable with your design
its just a super bad idea to present a character as “heres a ref sheet” as soon as you have a concept. your concept will evolve and u have to let it, or else ur designs will look rushed/bad and your drawing will looks stiff and uncomfortable bc u can only draw ur character at a ¾ths view in a particular pose bc youve drawn them twice in ur entire life
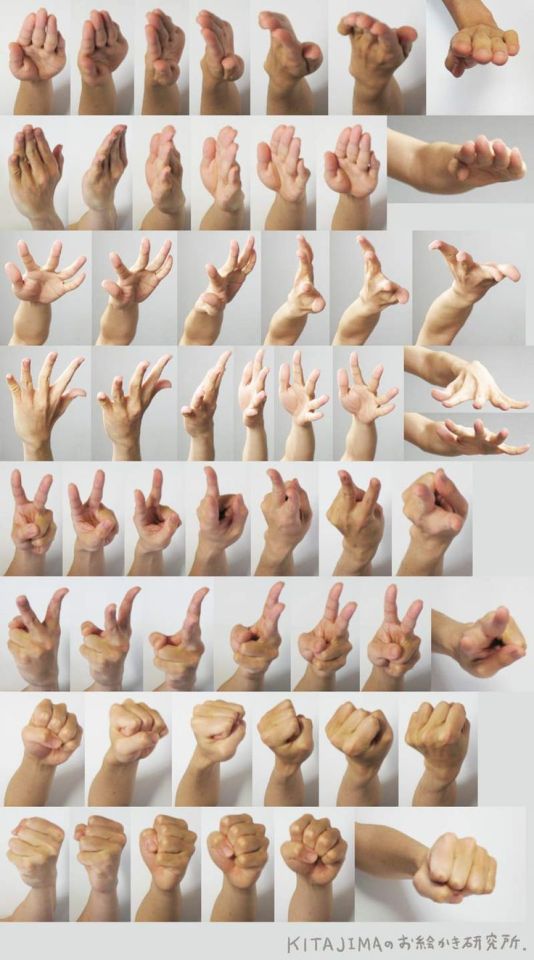
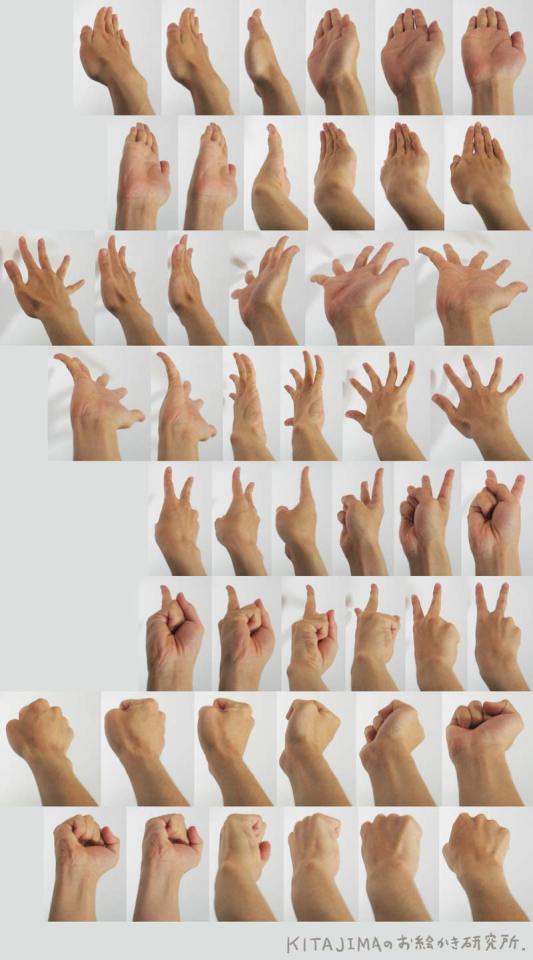
goombella123 asked: how 2 force myself to study so i can get better at anatomy and posing
pearbuddy asked: developing a steady practice? i know the best advice to getting better is to just draw, but i know a lot of people (myself included) struggle with actually making ourselves do it.
cuccosneverdie asked: what kind of practice you did to get good at anatomy? i’m really struggling getting anatomy to look even slightly correct
whereislaurita asked about: Anatomy; ;
elinmeat asked about: FACES. .…. FACES. … .
With regards to anatomy, my favourite book is Figure Drawing: Design & Invention by michael hampton, and lots of tutorials and references in my anatomy tag: http://helpfulharrie.tumblr.com/tagged/anatomy !
Which is all well and good… but how do you actually practice these things?
“Just draw a whole bunch” is only about 15% of the story. In order to self study, you need to:
Identify what you are struggling with. Reflect on what it is about your art you do not like so you can improve upon it!
Figure out what direction it is you want to take your art in. How do you want your art to look? You can find a post I wrote about art direction a couple years ago here: http://helpfulharrie.tumblr.com/post/120523296471/alrighty-then-friends-lets-talk-about-art-styles
Once you identify what you are unsatisfied with, you can figure out what knowledge you are lacking and study it. Read tutorials, books, ask other artists and friends for guidance and critique, etc.!
Then you want to start applying what you have learnt to your art! You can only get so far by reading something, to truly understand it you have to put it into practice and get a feel for what you have learnt.
So lets say, for example, you want to study faces.
You’ll want to seek out some resources that will help you understand the subject, a good place to start would be my faces tag: http://helpfulharrie.tumblr.com/tagged/faces
But I’ll get you started with two resources that helped me the most!
One: Stan Prokopenko’s series on drawing the head at any angle:
It’s a great breakdown of the Loomis Method, a series of guidelines for the face and head created by andrew loomis.
Two: The book I mentioned earlier! It covers the whole figure and I recommend getting it if you can, I do believe there are pdfs out there if you can’t get the book.
But! You can see two of the pages on drawing the head here: http://helpfulharrie.tumblr.com/post/105040269221/from-figure-drawing-design-and-invention
Now you’ve learnt some New Stuff, and you need to put it into practice so you can process what you’ve been told.
So start finding some references! For faces/hands/feet/the human figure, I recommend visiting https://line-of-action.com/, it’s full of photos you can use.
With your references in and, start by tracing the guidelines over the image. This will help you understand what they represent, and why they’re there.

This is a good exercise for understanding anatomy in general, let’s say you instead wanted to study giraffes and have no idea how to draw them.
Look for the large, consistent shapes, and those will become your construction guidelines!

Once you’ve gotten a feel for your guidelines, try them out! Do a bunch of sketches from imagination.

And when you’re confident with them, try them out by drawing from references.

And finally, go back to your art from before you started these studies, I’m going to use something I drew in 2013

And redraw it using what you’ve learnt!

While you’re doing this, pay attention to the areas you got wrong. Make a note of this, so you don’t repeat it in the future.

Ah, much better!
Now repeat the process of: Identify problem, research problem, study problem, apply what you learnt, and you’ll improve for sure. It’ll take time, but the more you learn the closer your art will get to the image you want it to be!
In this post I focused on anatomy studies, but you can do the same thing with anything.
Like for example: colour studies, in that case you would:
read about colour theory
find some references full of colours you like, and colour pick out the palette
analyse the relationships btwn the colours based on what you read. What kind of colour scheme is this? how are these colours influencing the mood? etc.
then take an old piece and redo the colour scheme, making note of why you were dissatisfied with the old colours.
The most important part of this is that you experiment with what you’re reading about and being taught, and then going back and seeing where it was lacking in your work before so you can apply it to your work in the future!
Best of luck everyone! I hope that helps nwn
You can always ask me for pointers if you need, and remember! Take pride in what you create, everything you do is a work of art.
It’s easy to get caught up in the cycle of improve, improve, improve - but don’t forget to appreciate how far you’ve come.
Lastly, if this was helpful to you, you can support me on Patreon, Liberapay, or Ko-Fi so I can keep writing these posts! Thank you 💕