Your personal Tumblr journey starts here
Art Resources - Blog Posts
blog dedicated to categorizing and saving various posts i find helpful. main blog @venomgender ;
newly rbed posts almost definitely won't be tagged, but (in theory) they'll all be tagged within the month
tag explanations below cut:
#piracy - self explanatory. has both piracy tutorials and masterposts of pirated media
#digital privacy - posts dedicated to resources on digital privacy; has things ranging from browser extensions to google product alternatives
#cooking - cooking resources. both general how-tos and actual recipes
#trans - trans resources. more dedicated to transmasc than transfem posts just because im transmasc, but has several generalized posts as well
#art resources - self explanatory. has both tutorials and things like resource packs and stuff
#writing resources - self explanatory
#learning - learning resources, typically dedicated to masterposts about learning a specific "thing" (language, sewing basics, etc)
#media rec - media recommendations
#sewing - sewing resources. has both tutorials and sewing patterns
#tech - technology resources. stuff like removing windows 10 bloatware, switching to linux, improving pc performance
#video game resources - resources centered around making video games
#coding - coding resources. from basic language how-tos to how to make your own websites
#save - any other helpful post i see that doesnt easily fit into the above categories. typically has things that help with "adulting" but i dont like that word so im not making a tag for it.
#megathread - any post containing large amounts of links for different things. contains a variety of categories. mildly depreciated in terms of how often i actually tag things this...
#tutorial - posts that teach you things. normally will also be tagged with a more specific category. also mildly depreciated...
additionally anything tagged 'kinda' means it only sort of falls into the tagged category. i tag these things to in theory go through later and see if theres enough similar items to have them been grouped into a new one
hot artists don't gatekeep
I've been resource gathering for YEARS so now I am going to share my dragons hoard
Floorplanner. Design and furnish a house for you to use for having a consistent background in your comic or anything! Free, you need an account, easy to use, and you can save multiple houses.
Comparing Heights. Input the heights of characters to see what the different is between them. Great for keeping consistency. Free.
Magma. Draw online with friends in real time. Great for practice or hanging out. Free, paid plan available, account preferred.
Smithsonian Open Access. Loads of free images. Free.
SketchDaily. Lots of pose references, massive library, is set on a timer so you can practice quick figure drawing. Free.
SculptGL. A sculpting tool which I am yet to master, but you should be able to make whatever 3d object you like with it. free.
Pexels. Free stock images. And the search engine is actually pretty good at pulling up what you want.
Figurosity. Great pose references, diverse body types, lots of "how to draw" videos directly on the site, the models are 3d and you can rotate the angle, but you can't make custom poses or edit body proportions. Free, account option, paid plans available.
Line of Action. More drawing references, this one also has a focus on expressions, hands/feet, animals, landscapes. Free.
Animal Photo. You pose a 3d skull model and select an animal species, and they give you a bunch of photo references for that animal at that angle. Super handy. Free.
Height Weight Chart. You ever see an OC listed as having a certain weight but then they look Wildly different than the number suggests? Well here's a site to avoid that! It shows real people at different weights and heights to give you a better idea of what these abstract numbers all look like. Free to use.
Do you have any tattoos? ⚓️ I have a bunch, so I was very excited to come across these 19th century tattoo flash books in the Winterthur Library – and they’re digitized! You can see them here 📚
Geology of Natural Disasters and How to write them into your fictional universe.
So, you want to write about a natural disaster to advance your plot and torture your players/characters even more? Let me tell you how, accurately.
I feel like unless it is a volcano, natural disasters are a pretty slept on plot drivers, and some of them are really cool and unique! Today, I will talk to you about land slides, earthquakes (And earthquake related disasters), and volcanoes.
Landslides: Probably one I see the least in stories, but one that would be incredibly interesting to write into a plot where they believe in curses. Landslides can happen along ocean bluffs, slightly hilly areas, and highly mountainous areas, this means it is something that can happen in most landscapes. But what can trigger a landslide? Mostly all you need to trigger a landslide could be just abnormally large amounts of rain, excessive deforestation (with a little bit of rain), or an earthquake. If you don't want to use deforestation or an earthquake as a catalyst, a really cool indicator that the land is slipping and may be prone to a collapse is J hooked trees.

This indicates that there is soil creeping slowly over time, and it may lead to a major landslide.
2. Earthquakes: Probably one of the easiest things to write, earthquakes can happen anywhere, but they are most common in places that are tectonically active areas. There are about three types of environments you can expect earthquakes to be common. The first is just rugged mountains, if your landscape looks like this, you should write in earthquakes. Associated hazards could be landslides, avalanches, and large falling rocks.

The next landscape could be a thin mountain range, next to the ocean, very scenic, but very dangerous. Essentially, I am describing a subduction zone environment.

Earthquakes in these areas could equal a couple different associated disasters. Scenario one: A very large earthquake happens, and the ocean begins to recede. This is a tsunami, enough said. If you are writing a tsunami though, please, please, do not write it as a large wave, thank you. Also, a common way people are hurt by tsunami's are from them going into the ocean because they don't understand a tsunami is going to happen.

Scenario two: A large earthquake happens, your characters are in a valley and suddenly the ground begins to liquify as the ground shakes, once the shaking stops, the ground becomes solid like nothing ever happened, except everything has suddenly sunk into the now hard ground. This is called liquefaction and it typically happens in areas that have loose dirt or lots of saturated soil.

Scenario three: There are a lot of small earthquakes, they do not cause a lot of damage, but you begin to notice that one of the isolated mountains has a plume rising. Earthquakes can indicate lava moving underground and the filling of magma chambers.

The next environment that can host lots of earthquakes would be regions that have a lot of really deep valleys and small mountain ranges (not cone volcanoes), but overall seems pretty flat.

This indicates a transform fault like the San Andreas. If you want to hint at there being earthquakes in the area, you can show fence posts that are suddenly several feet out of line at a dilapidated farm or something similar.

(These earthquakes are different because they are cased from sideways movement, not an up-and-down movement this hint can only be used for this environment). Volcanoes would not be found here, but liquefaction and landslides could still occur here.
4. Volcanoes: If you thought earthquakes had a lot of information, volcanoes do too. First you have to ask yourself, what kind of volcano you want to have, what kind of eruption style? So lets break down the kind of eruptions you can have and what their landscapes look like. Hawaiian Shield volcano: This will produce a smooth fast lava, the landscape typically is pretty flat, but there will be small cones and the rocks can have a ropey or jagged texture and the rocks will be almost exclusively black to dark red.

Stratovolcanoes: These will be solitary mountains, typically, that look like perfect cones (Picture shown in earthquake section). These will have large ash cloud eruptions and pyroclastic flows, they may have some lava, but typically most damage is done from the pyroclastic flows (think Pompeii). Some hints of these, other than describing the cone features (which can be hidden by other mountains), would be to talk about petrified wood! Trees can get fossilized in the ash and I imagine it would be very strange to find this rock that clearly looks to be a piece of wood, but its a rock. Subcategory- Calderas: Used to be a large stratovolcano, but they erupt so explosively that the entire cone collapses and creates a basin.

There are a lot of kinds of volcanoes out there, so forgive me for just putting an infographic and then talking to you about these really rare types of eruptions that I feel like people should know about.

Okay lets talk about blue lava (kind of) and black lava

You will notice the lava is still red in the middle of this image, during the day these would look like a normal eruption, but at night the burning sulfur would make it appear blue. Some cool features other than this, would be that any water in the area would become very acidic and burn the skin due to sulfuric acid. This would again be really cool if you are trying to describe a 'cursed' land.
Black lava: This happens only in the east African rift I believe, but it is a carbonatite lava, but if you are writing in a rift valley (where the continent is tearing apart to form a new ocean) this might be a cool feature. The lava will cool white and will quickly erode, it makes for a very alien landscape!

Anyway as always, this is supposed to be an introductive guide for the basics of writing geology to create cool landscapes/features into dnd or fictional universes, if you are a geologist please understand my oversimplification of tectonics, I didn't want people to run away.
HOW I ANIMATE 🤌
I couldn’t make individual gifs of this whole this so MADE A VIDJEW FOR YEW GOIS ! I didn’t know what else to make of my animation, so I decided to make it into a little quick tutorial. Hope it helps!


My first anatomy tutorial! How I connect arms to the torso. Simplified the muscles for better comprehension
PS. Pectoral is misspelled as “pectorial” in the picture! Don’t make that mistake haha


vitiligo notes for artists
I’ve noticed that vitiligo has been becoming more common in art, and I think that’s really cool! But as a person with vitiligo, and an artist, there are few mistakes I’ve noticed in people’s portrayal of the condition that I wanna address.
1. It’s not random. Vitiligo tends to appear more often in specific places, like around the mouth or eyes, the belly button, as well as on the hands and feet. It also tends to be at least a little bit symmetrical.
2. It doesn’t change your eye color. However in some cases it can cause patches of hair to turn white or blonde.
3. It changes over time. As a kid I had tons of vitiligo spots on my feet and legs, but they eventually faded. For a long time I didn’t have any until I developed a spot above my right eye about a year ago. So if you’re portraying a character at different points in their life, their vitiligo should change too.
4. All skin colors can have vitiligo. I’ve noticed on Picrew and other character maker games vitiligo will sometimes only be an option for characters with dark skin. Obviously it won’t be as obvious on light skin, but unless your character is a person with albinism it should still show up.
that’s all I’ve got for now, if I think of more I might make another post :)


artistically-gay’s Hair Tutorial

So! before we begin, I wanna state that the program I use is Fire Alpaca, though this tutorial can be applied to different art programs as well! Some brushes and filters may work a bit differently from program to program.

First, we need to go over the brush checklist! These are the brushes you’re going to be working with: - Watercolor 1 (Turn ON size by pressure) - Watercolor 2 (Turn OFF size by pressure) - Airbrush
We’ll start off with a base color. A lightish color is the easiest to work with when you start out. A caramel color should work best for practice.

You’re going to want to duplicate the color layer. The duplicated layer is where most of the coloring is going to be done. Lock the first layer to make sure you don’t accidentally work on the wrong layer. I’ve had this accident several times and ended up wasting an hour or two.
You’ll need to have an understanding of color theory for this, but I’ll be linking a post at the end that can help give some guidance on shading with the say I do it!
We’ll be shading our caramel-colored strip with a dark red, and making highlights with a light and pale yellow!

Take Watercolor 2 and start creating strokes with varying pressure. Try and go lighter with the shading in where you want your highlights to be, and go heavier where the shadows will be.
Using Watercolor 2 gives you a guideline to follow before using Watercolor 1, which is where detailing will come in.
Now you start using Watercolor 1. Try and have it small, since this is the detailing brush and you’re trying to mimic the visuals of having individual hair strands. Remember to have lighter pressure where the highlights will be and heavier where shadows will be.

Duplicate this layer again with Watercolor 1, and then repeat this process with your highlighting color, in this case the yellow! After this, you can adjust the opacity oh this layer until you feel satisfied with how the highlights look!
Now it’s time to clip and merge the layers! After this, we’ll be moving on to the final steps, these steps involving the airbrush tool.

Returning to our dark red shading color, use the Airbrush tool to place some soft shading depending on your picture’s light source. After that, use the layer filter settings and either apply Multiply or Hard Light, it really depends on your preference*. Adjust opacity to your preference as well.
*personally, I like to use Hard Light more than Multiply.
Repeat this process with your highlight color. Use the layer filter settings and choose either Overlay or Soft Light. Again, you can go with whichever you prefer.

And that’s my hair tutorial! Feel free to practice and experiment with this method in any way that you like! I hope that I was able to be of help to the people who were interested!
Here you can find the post I mentioned about shading!


some puppies studies ( ͡° ͜ʖ ͡°) 🐶 | Instagram
(Edited) + more studies lkdafña
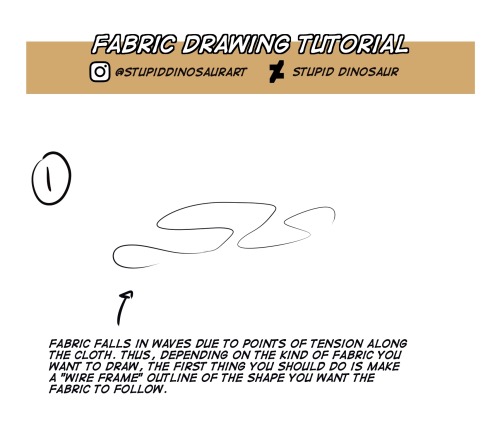
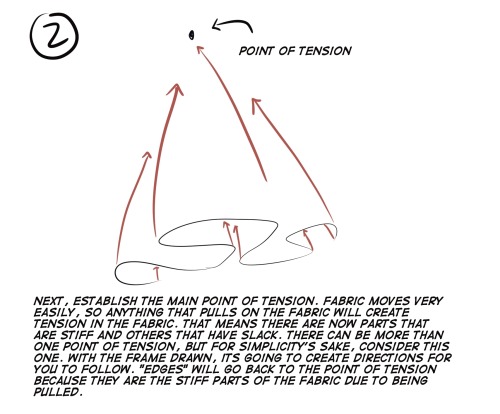
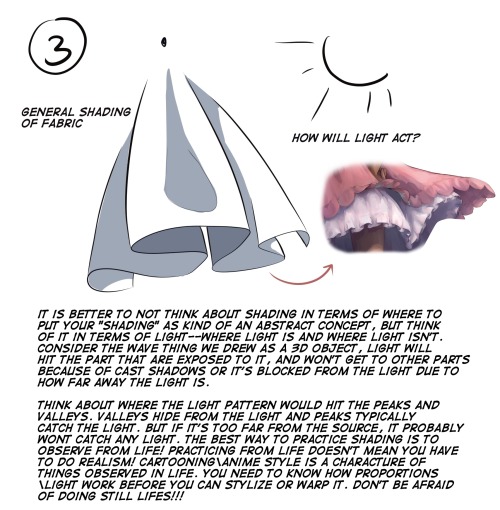
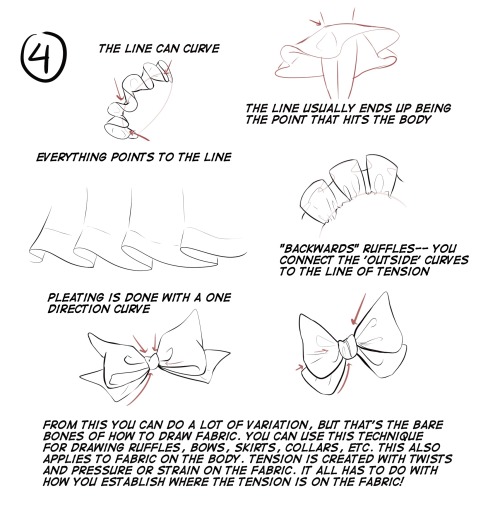
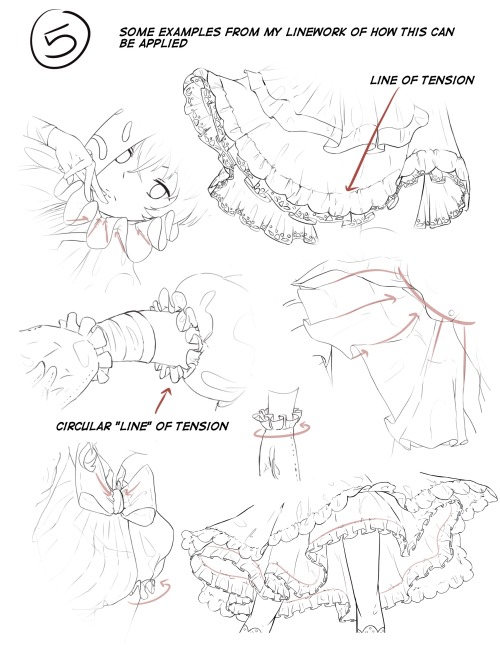
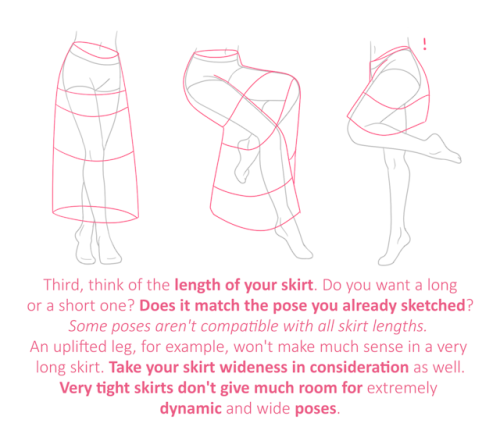
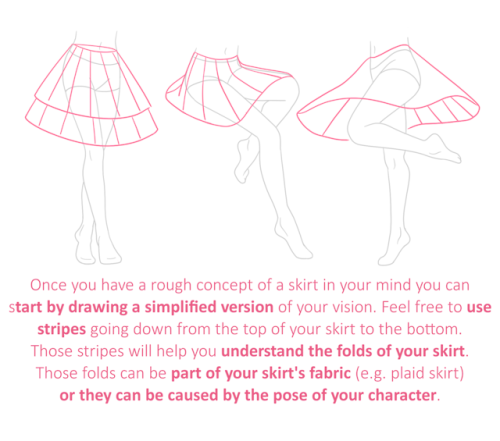
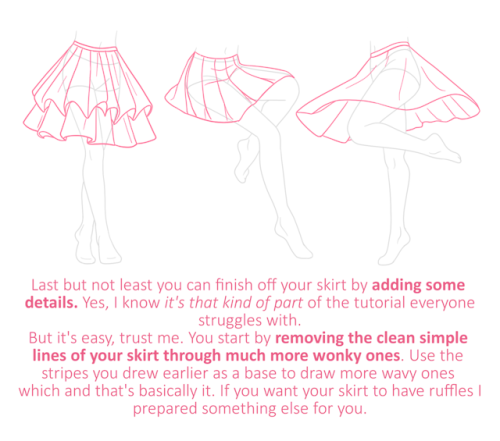
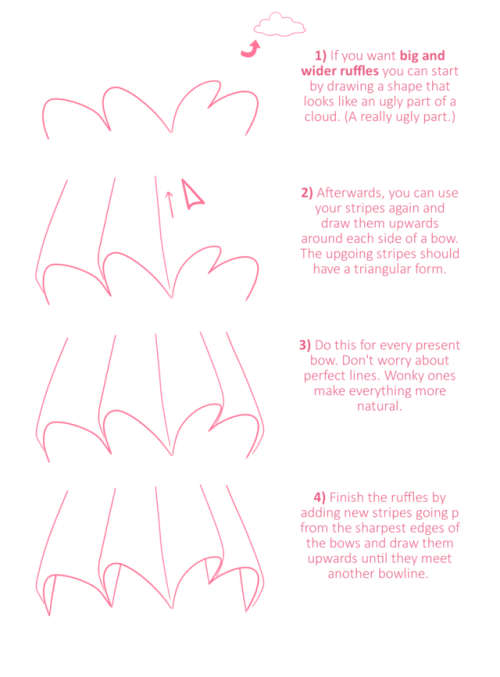
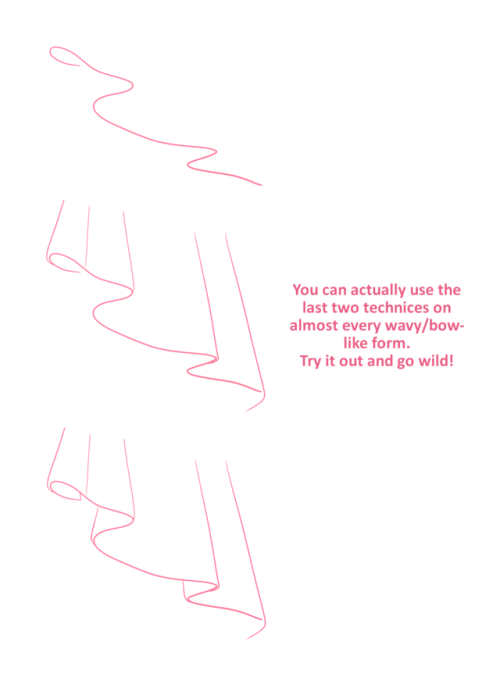
I’ve been getting some requests to make a tutorial on how to draw fabric. It’s really not that complicated when you break it down, but it’s still something people get stuck on and over complicate. Here’s my “bare bones” simple explanation as to how to draw fabric!

a pal asked me how i drew teeth so i made this quick lil mini tutorial on how i do it!! this is by no means a professional tutorial and im still learning but i hope this might b helpful to some!


How do you draw noses?
I’m not sure what specific part you’re wondering about, so here’s a run-through of my process from sketching to painting!
1) The first thing I do is simplify the nose into a few basic shapes to get a prism-like block, like so:

2) I can now easily draw the prism shape in three-dimensional space depending on the angle and rotation of the head.

3) Using the guidelines/planes I can draw a proper nose in any angle! There aren’t many tricks or shortcuts for this step, unfortunately (other than practicing lots). I recommend using references, they’re always helpful :)
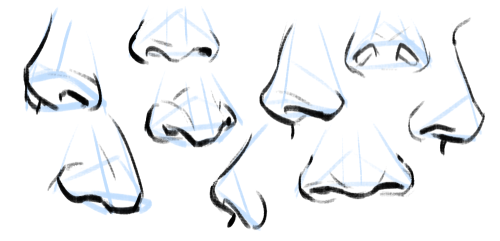
4) Really important to note: all noses vary greatly, especially from different ethnicities! A high-bridge “aristocratic” sort of nose or a ski-slope button nose might be accurate for some people, but definitely not everyone. Compare differences in size, width, a hooked or button nose tip, high or low nose bridge, and so on:

5) Then I paint! I have a skin tone tutorial here, if it helps. Take note of the lighting, skin tone, etc. Here are some things I keep in mind:
For pale skin tones, the nose sometimes has a redder colouration than the rest of the face because of increased blood flow.
The nose also usually has highlights (due to oil). These are located on the tip of the nose, the nostril groove, and where the base of the nose meets the flat area of skin around it!

Hope this helps! In the end, all stylistic choices are completely up to you. Art’s subjective, so feel free to draw any noses you want :)
hot artists don't gatekeep
I've been resource gathering for YEARS so now I am going to share my dragons hoard
Floorplanner. Design and furnish a house for you to use for having a consistent background in your comic or anything! Free, you need an account, easy to use, and you can save multiple houses.
Comparing Heights. Input the heights of characters to see what the different is between them. Great for keeping consistency. Free.
Magma. Draw online with friends in real time. Great for practice or hanging out. Free, paid plan available, account preferred.
Smithsonian Open Access. Loads of free images. Free.
SketchDaily. Lots of pose references, massive library, is set on a timer so you can practice quick figure drawing. Free.
SculptGL. A sculpting tool which I am yet to master, but you should be able to make whatever 3d object you like with it. free.
Pexels. Free stock images. And the search engine is actually pretty good at pulling up what you want.
Figurosity. Great pose references, diverse body types, lots of "how to draw" videos directly on the site, the models are 3d and you can rotate the angle, but you can't make custom poses or edit body proportions. Free, account option, paid plans available.
Line of Action. More drawing references, this one also has a focus on expressions, hands/feet, animals, landscapes. Free.
Animal Photo. You pose a 3d skull model and select an animal species, and they give you a bunch of photo references for that animal at that angle. Super handy. Free.
Height Weight Chart. You ever see an OC listed as having a certain weight but then they look Wildly different than the number suggests? Well here's a site to avoid that! It shows real people at different weights and heights to give you a better idea of what these abstract numbers all look like. Free to use.
i love love love when artists put a bunch of effort into like human anatomy and facial features and light rendering and drawing fabric folds and shadows and texture and then when they draw a gun they do this


Art Help

I redid this list because broken links 💀
General Tips
Stretch your fingers and hands
Art is for fun
Never too late to start/improve
Tumblr radar! Submit your work!?
Using a tablet
Editing software: pictures & video
Moodboard resources
Comic pacing
Storyboarding techniques
Watercolor
Coloring
Color Theory (not children's hospital)
Resources: coloring things a different color
Gold
Dark Skin undertones
Dark Skin in pastel art
POC Blush tones
Eyes colors
Cohesive Color Palette
Lights and Colors
Human Anatomy
POSE REFERENCES
Eyes: pupil shape, direction
Wizard Battle poses
Romance poses
Shoulders
Tips for practicing anatomy
Proportional Limbs
Skeletons
Hair Directions
Afro, 4C hair
Cane use
Dingle dongles: male reproductive
Clothing
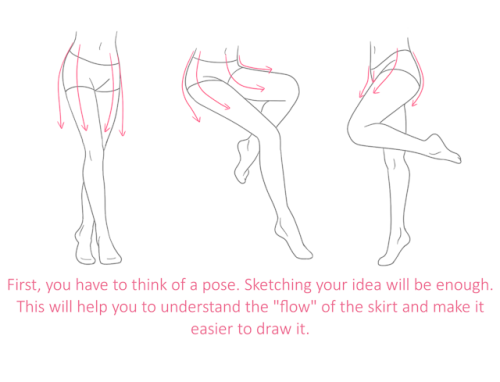
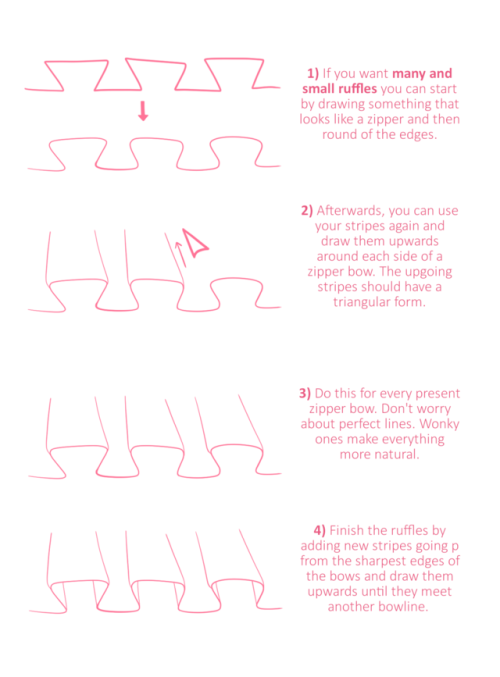
Long skirts
Traditional Chinese Hanfu (clothing reference)
Cultural clothes
CLOTHING REFERENCE
Medieval armor
Sewing information
Animals
Horse -> Dragon
Snouts: dogs, cats, wolves, fox
Foot, paw, hoof
More
Drawing references sources
Art tutorial Masterlist
Another art tutorial Masterlist
Inspiration: father recreates son's art
Inspiration: Lights
ART BOOKS
Plants/flowers: North America, Hawaii, Patagonia
Art Cheats
hot artists don't gatekeep
I've been resource gathering for YEARS so now I am going to share my dragons hoard
Floorplanner. Design and furnish a house for you to use for having a consistent background in your comic or anything! Free, you need an account, easy to use, and you can save multiple houses.
Comparing Heights. Input the heights of characters to see what the different is between them. Great for keeping consistency. Free.
Magma. Draw online with friends in real time. Great for practice or hanging out. Free, paid plan available, account preferred.
Smithsonian Open Access. Loads of free images. Free.
SketchDaily. Lots of pose references, massive library, is set on a timer so you can practice quick figure drawing. Free.
SculptGL. A sculpting tool which I am yet to master, but you should be able to make whatever 3d object you like with it. free.
Pexels. Free stock images. And the search engine is actually pretty good at pulling up what you want.
Figurosity. Great pose references, diverse body types, lots of "how to draw" videos directly on the site, the models are 3d and you can rotate the angle, but you can't make custom poses or edit body proportions. Free, account option, paid plans available.
Line of Action. More drawing references, this one also has a focus on expressions, hands/feet, animals, landscapes. Free.
Animal Photo. You pose a 3d skull model and select an animal species, and they give you a bunch of photo references for that animal at that angle. Super handy. Free.
Height Weight Chart. You ever see an OC listed as having a certain weight but then they look Wildly different than the number suggests? Well here's a site to avoid that! It shows real people at different weights and heights to give you a better idea of what these abstract numbers all look like. Free to use.
RESOURCES FOR POSES
Line of Action

JustSketch.Me

PoseManiacs

Human-Anatomy-For-Artist.com

MagicPoser

MIXAMO

Pose Archives

Bodies in Motion

Posemy.art

ReferenceAngle

CroquisCafe

hot artists don't gatekeep
I've been resource gathering for YEARS so now I am going to share my dragons hoard
Floorplanner. Design and furnish a house for you to use for having a consistent background in your comic or anything! Free, you need an account, easy to use, and you can save multiple houses.
Comparing Heights. Input the heights of characters to see what the different is between them. Great for keeping consistency. Free.
Magma. Draw online with friends in real time. Great for practice or hanging out. Free, paid plan available, account preferred.
Smithsonian Open Access. Loads of free images. Free.
SketchDaily. Lots of pose references, massive library, is set on a timer so you can practice quick figure drawing. Free.
SculptGL. A sculpting tool which I am yet to master, but you should be able to make whatever 3d object you like with it. free.
Pexels. Free stock images. And the search engine is actually pretty good at pulling up what you want.
Figurosity. Great pose references, diverse body types, lots of "how to draw" videos directly on the site, the models are 3d and you can rotate the angle, but you can't make custom poses or edit body proportions. Free, account option, paid plans available.
Line of Action. More drawing references, this one also has a focus on expressions, hands/feet, animals, landscapes. Free.
Animal Photo. You pose a 3d skull model and select an animal species, and they give you a bunch of photo references for that animal at that angle. Super handy. Free.
Height Weight Chart. You ever see an OC listed as having a certain weight but then they look Wildly different than the number suggests? Well here's a site to avoid that! It shows real people at different weights and heights to give you a better idea of what these abstract numbers all look like. Free to use.
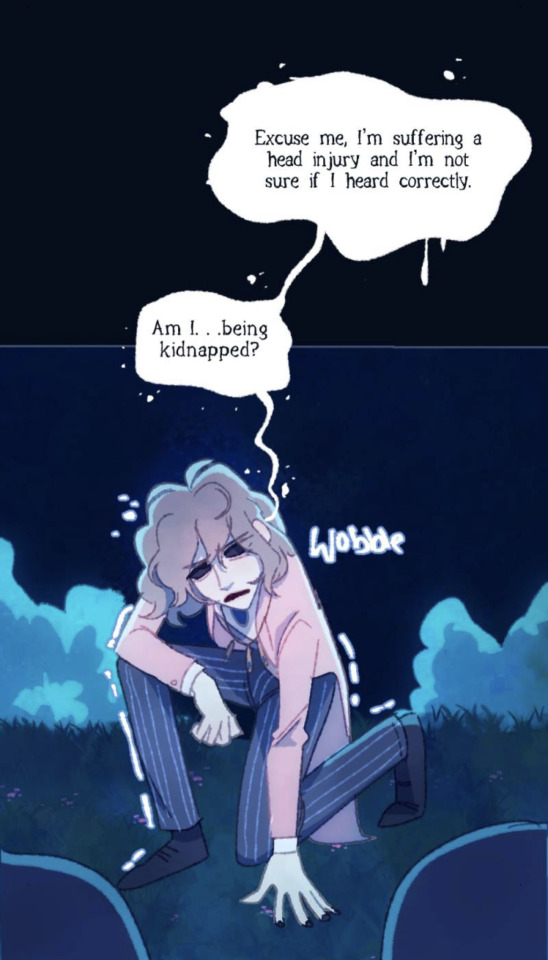
Note to Self - Speaking without Words with Word Balloons
Word gallons are for more than just words. They can be used to emphasis and even add emotions and to a scene
Feeling dizzy? About to pass out?

A lilting playful swirl (Time and Time Again by Deo I)

The white and black of the text has been replaced with a sinister black and the words are off tilter (Sword Interval by Benjamin Fleuter)

The voice is coming from a place deeper and more unsettling and the text is uneven and handwritten

A dismissive comment literally (metaphorically) stabs someone (Marionetta by Míriam Bonastre Tur)

Being interrupted before finishing what is being said

A withering and icy reply (The Secrets of Soulford by the Quincil)

Wobbly uncertain bubbles that even break apart in some parts from dizziness (The Blind Prince by cozycroww)
Pain almost appears to be breaking the usually round bubble into uneven and broken balloons. The little smaller balloons around it are reminiscent of sweat or tears (Heir’s Game by suspu)


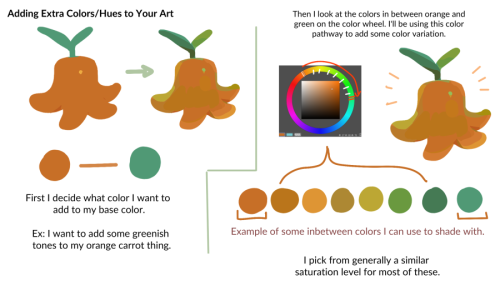
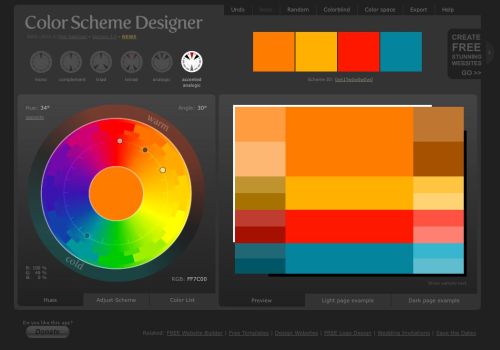
HEYY my 2nd color tips pdf is now available ! ^o^ hope you enjoy!
BUY HERE or HERE
Can't afford art school?
After seeing post like this 👇

And this gem 👇
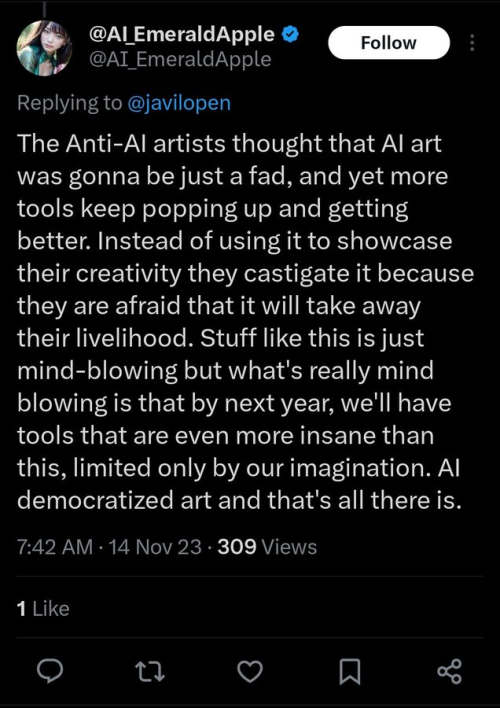
As well as countless of others from the AI generator community. Just talking about how "inaccessible art" is, I decided why not show how wrong these guys are while also helping anyone who actually wants to learn.
Here is the first one ART TEACHERS! There are plenty online and in places like youtube.
📺Here is my list:
Proko (Free, mostly teaches anatomy and how to draw people. But does have art talks and teaches the basics.)
Marc Brunet (Free but he does have other classes for a cheap price. Use to work for Blizzard and teaches you everything)
Aaron Rutten (free, tips about art, talks about art programs and the best products for digital art)
BoroCG (free, teaches a verity of art mediums from 3D modeling to digital painting. As well as some tips that can be used across styles)
Jesse J. Jones (free, talks about animating)
Jesus Conde (free, teaches digital painting and has classes in Spanish)
Mohammed Agbadi (free, he gives some advice in some videos and talks about art)
Ross Draws (free, he does have other classes for a good price. Mostly teaching character designs and simple backgrounds.)
SamDoesArts (free, gives good advice and critiques)
Drawfee Show (free, they do give some good advice and great inspiration)
The Art of Aaron Blaise ( useful tips for digital art and animation. Was an animator for Disney. Mostly nature art)
Bobby Chiu ( useful tips and interviews with artist who are in the industry or making a living as artist)
Sinix Design (has some tips on drawing people)
Winged canvas (art school for free on a verity of mediums)
Bob Ross (just a good time, learn how to paint, as well as how too relax when doing art. "there are no mistakes only happy accidents", this channel also provides tips from another artist)
Scott Christian Sava (Inspiration and provides tips and advice)
Pikat (art advice and critiques)
Drawbox (a suggested cheap online art school, made of a community of artist)
Skillshare (A cheap learning site that has art classes ranging from traditional to digital. As well as Animation and tutorials on art programs. All under one price, in the USA it's around $34 a month)
Human anatomy for artist (not a video or teacher but the site is full of awesome refs to practice and get better at anatomy)
Second part BOOKS, I have collected some books that have helped me and might help others.
📚Here is my list:
The "how to draw manga" series produced by Graphic-sha. These are for manga artist but they give great advice and information.
"Creating characters with personality" by Tom Bancroft. A great book that can help not just people who draw cartoons but also realistic ones. As it helps you with facial ques and how to make a character interesting.
"Albinus on anatomy" by Robert Beverly Hale and Terence Coyle. Great book to help someone learn basic anatomy.
"Artistic Anatomy" by Dr. Paul Richer and Robert Beverly Hale. A good book if you want to go further in-depth with anatomy.
"Directing the story" by Francis Glebas. A good book if you want to Story board or make comics.
"Animal Anatomy for Artists" by Eliot Goldfinger. A good book for if you want to draw animals or creatures.
"Constructive Anatomy: with almost 500 illustrations" by George B. Bridgman. A great book to help you block out shadows in your figures and see them in a more 3 diamantine way.
"Dynamic Anatomy: Revised and expand" by Burne Hogarth. A book that shows how to block out shapes and easily understand what you are looking out. When it comes to human subjects.
"An Atlas of animal anatomy for artist" by W. Ellenberger and H. Dittrich and H. Baum. This is another good one for people who want to draw animals or creatures.
Etherington Brothers, they make books and have a free blog with art tips.
📝As for Supplies, I recommend starting out cheap, buying Pencils and art paper at dollar tree or 5 below. If you want to go fancy Michaels is always a good place for traditional supplies. They also get in some good sales and discounts. For digital art, I recommend not starting with a screen art drawing tablet as they are usually more expensive.
For the Best art Tablet I recommend either Xp-pen, Bamboo or Huion. Some can range from about 40$ to the thousands.
💻As for art programs here is a list of Free to pay.
Clip Studio paint ( you can choose to pay once or sub and get updates. Galaxy, Windows, macOS, iPad, iPhone, Android, or Chromebook device. )
Procreate ( pay once for $9.99 usd, IPAD & IPHONE ONLY)
Blender (for 3D modules/sculpting, animation and more. Free)
PaintTool SAI (pay but has a 31 day free trail)
Krita (Free)
mypaint (free)
FireAlpaca (free)
Aseprite ($19.99 usd but has a free trail, for pixel art Windows & macOS)
Drawpile (free and for if you want to draw with others)
IbisPaint (free, phone app ONLY)
Medibang (free, IPAD, Android and PC)
NOTE: Some of these can work on almost any computer like Clip and Sai but others will require a bit stronger computer like Blender. Please check their sites for if your computer is compatible.
So do with this information as you will but as you can tell there are ways to learn how to become an artist, without breaking the bank. The only thing that might be stopping YOU from using any of these things, is YOU.
I have made time to learn to draw and many artist have too. Either in-between working two jobs or taking care of your family and a job or regular school and chores. YOU just have to take the time or use some time management, it really doesn't take long to practice for like an hour or less. YOU also don't have to do it every day, just once or three times a week is fine.
Hope this was helpful and have a great day.
"also apologies for any spelling or grammar errors, I have Dyslexia and it makes my brain go XP when it comes to speech or writing"


Someone wanted some facial advice, so I just collect some tips. Free to ask for more advice.