BioShock Resource Masterpost
BioShock Resource Masterpost
Due to multiple requests I’ve decided to collect all the free BioShock material I’ve shared under one post for ease of access. Because of size restrictions, some will have to be downloaded to be read, but I hope you enjoy anyways!
BioShock Artbooks
Breaking the Mold: The Art of Bioshock
Deco Devolution: Art of Bioshock 2
Art of Bioshock Infinite
If you like the physical books better, you can buy them here: The Art Of Bioshock Infinite & Deco Devolution: The Art of BioShock 2. The art book for the original Bioshock is very rare and expensive.
BioShock Novelizations & Original Pitch Document
BioShock: Rapture (eBook) (audiobook)
BioShock Infinite: Mind In Revolt (Spanish edition)
BioShock: First Person Action Horror
If you’d like a store-bought copy better, you can them here: BioShock Infinite: Mind In Revolt & BioShock: Rapture eBook or audiobook.
Extended Resources
Artbook Masterlist: All non-BioShock artbooks I’ve collected
If you’re worried about the downloads being infected/bugged or whatever don’t be- I bought them legally and am putting them up on a private google docs for easy access.
More Posts from Nastysynth and Others
so playing andromeda and drawing kaleans got me thinkin’ on another minor complaint i have about ME and it’s this:
dang they can’t figure out how to make digitigrade legs work on a humanoid character and they end up adding extra joints to the legs to try to make it make sense
like i watched the animation cycle of that angara working out at the resistance camp and when he started doing crunches and his legs made an M shape i was just like smdh
i mean i think they handle it better with the angara since they have those weird little hand-feet (angara are so cute i cannot stand it) but the worst offender is probably the salarians
anyway i love the concept of humanoids with digitigrade legs so here’s some notes about it. it’s not beautifully formatted or anything but maybe it’s helpful!
basically the main thing to get out of your mind is that you’re not going for “backwards knees.” i am sure backwards knees could work and would be an interesting design, but it’s gonna change how this character moves and sits, it’s gonna affect the character’s center-of-gravity, it’s gonna be a much bigger overhaul of the anatomy than creating a digitigrade leg requires.
when you’re thinking of a digitigrade leg as having backwards knees, it’s probably because the joint you’re thinking of as the knee is actually the ankle
both plantigrade and digitigrade legs will have four major points of articulation: the hip the knee the ankle the toes and a digitigrade leg isn’t a plantigrade leg backwards, but on its tiptoes:

that’s basically all you gotta do! then you exaggerate the effects by changing the proportions of the leg, starting with making the knee-ankle length shorter, and the ankle-toe length longer.
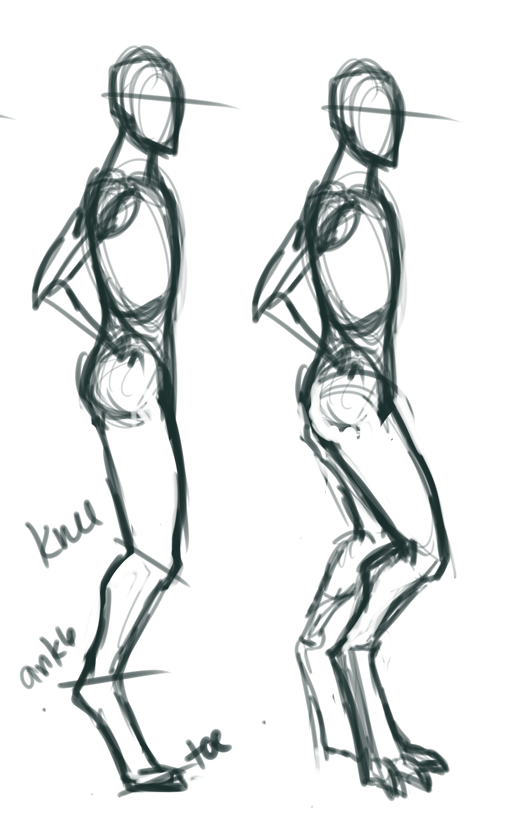
the benefit of drawing digitigrade characters like this is that they can sit in chairs without looking ridiculous!

and finally, if your character doesn’t have paws or hooves or talons, they probably want to wear shoes! hell, even if they do they still might wear shoes. the ground is nasty! think this through and let it be another cool design opportunity. a good place to start if you’re stuck is looking at wedge heels, then drawing them without the heel!

aaaand here’s some aliens

now get outta here and draw some weird-ass legs aight


some puppies studies ( ͡° ͜ʖ ͡°) 🐶 | Instagram
(Edited) + more studies lkdafña

I have no Idea how many people know this but its a life saver

Start off with a crappy scanned/phone taken picture like so

Mess around with the SAI Filters, I usually go color deepen all the way to the left then mess with brightness and contrast until I find a good balance I like, then to top it off with a copied layer on multiply to make the lines darker

Click what I boxed off and the magic has already happened

you now are left with a clean lineart layer that you can color underneath to your liking : 0 Hell you can even color your lines however you want as well for a colored lineart
![Patreon: [patreon.com/lunaartgallery]](https://64.media.tumblr.com/6dd76e17df224b3826e5866282b6cd57/6ab8034c06b9e862-5e/s500x750/25f94543a8524d030c9cff0e9a9786daa2174e4c.png)
![Patreon: [patreon.com/lunaartgallery]](https://64.media.tumblr.com/ec25543ee78d89a38f34fc59a6e126ec/6ab8034c06b9e862-fb/s500x750/cffc02b6e72d78c6ec0e718591773a8126fa8e8b.png)
![Patreon: [patreon.com/lunaartgallery]](https://64.media.tumblr.com/1716c74ce43b8492822be5cdd59a5361/6ab8034c06b9e862-eb/s500x750/a15ed68ec5e79800e2c4084a7dce932388788006.png)
![Patreon: [patreon.com/lunaartgallery]](https://64.media.tumblr.com/7cd552c8503df33edca0d09509f91dbc/6ab8034c06b9e862-3b/s500x750/5351cb62cc31e8805197148e8b20b496b1015ef9.png)
![Patreon: [patreon.com/lunaartgallery]](https://64.media.tumblr.com/5976e680b65f566912194b7509bbc3f5/6ab8034c06b9e862-65/s500x750/1f99cfdfee09332c1dd4a1a3824f7c83dcd4f917.png)
Patreon: [patreon.com/lunaartgallery]
My last drawing tutorial was back in 2017, whoa, welp it looks like my drawing skills have gotten better. Since I have some more spare time, I will be doing new/updated art tutorials revisiting some of my previous topics.
I’ll post the tips publicly but my reference material and examples will be Patreon exclusive. If you like these tips and want to see more, support my Patreon! It allows me to focus on more material like this and I would really appreciate it .
Thanks! ——-—— Devi: [deviantart.com/miss-noidentity] Twitter: [@LunaArt_Gallery] Instagram: [@lunaartgallerys]
Do you have any tips for drawing in the Pokemon style??
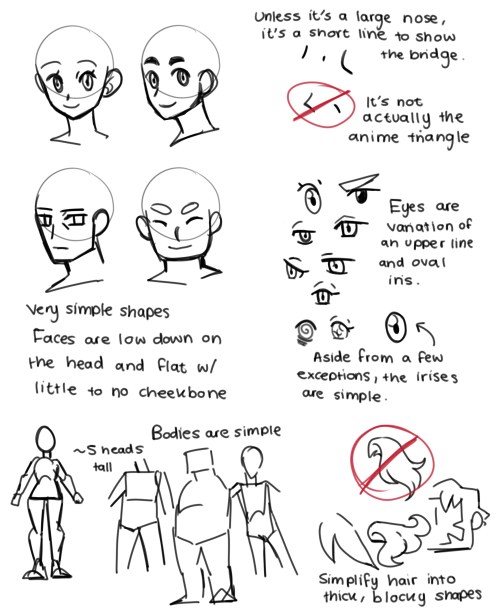
These are just some rough notes. I don’t draw that often in the pokemon style so these are a little more basic than I could give on other styles.
For colouring advice, this is a great resource to use: https://tunnaa-unnaa.tumblr.com/post/162328103349 It goes through the styles of different pokemon artists.
types of people as tarot cards — major arcana
the fool. young at heart, considered ‘innocent’ by others, a dreamer, naive, great potential, loyal friend, adventurous, believes in magic, believes in the good of other people.
the lovers. emotional, turbulent, easily tempted, falls in love easily, spiritual, constantly caught in the struggle between good and evil, hates being alone.
justice. strives for fairness and equality, enjoys balance, always looking to learn something new, can be aggressive and severe, great memory, great debater.
death. always looking for a fresh start, self-destructive, interested in politics, hates feeling stuck, radical beliefs, loves solving problems, reads dystopian novels.
the tower. chaotic, argumentative, loud and outspoken, self-centered, incredibly ambitious, risk-taker, will do anything to get what they want, impulsive.
the sun. an open book, control freak, finding the beauty in ordinary things, happy-go-lucky, belongs to several friend groups, not afraid to cry in public.
the world. loves to travel, hates change, unabashedly unique, loves to dance, has great luck, seems to always get what they want, gets attached too easily.
Tusks!

no trouble at all! Here are some visual notes on how i approach orc teeth.
1: get familiar with the structure.

The better you can visualise the structure of teeth and where the tusks “plug in”, the easier step 2 will be.
2: simplify.
You only need to draw what will be visible. Don’t worry about drawing the anatomy right every time. If you get familiar with the structure underneath, it will be easier to spot when something’s off in your sketch.

Works for upper tusks and lower! Visualise –> Simplify
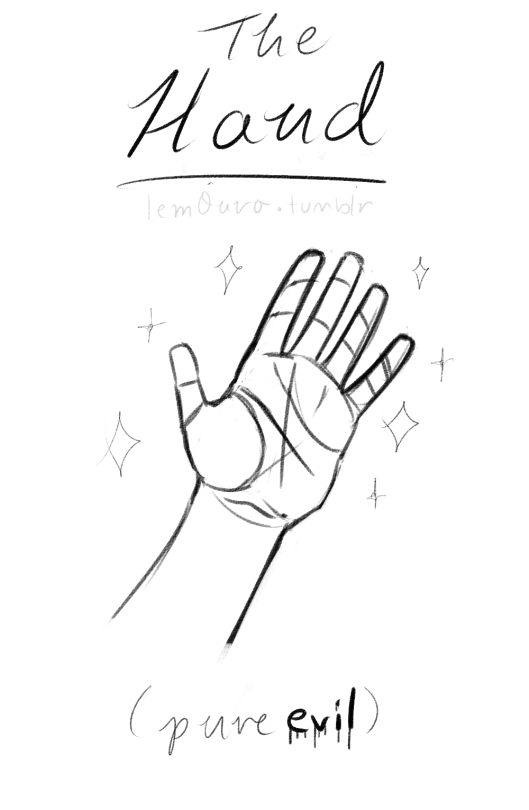
I'm kinda ashamed to ask this, but could you make a tutorial on how to draw hands? ;A;
omg dont be ashamed at all!! Hands are generally tough to get used to, lots of artists struggle with it! so dont be ashamed i feel you.
and I actually have made a hand anatomy guide before in fact! If you want to get better at drawing hands I def recommend you learn the basic anatomy first. Please check out the ones I made, I try to make it simple and easy to understand:
Artistic Anatomy: Hands Part 1
Artistic Anatomy: Hands Part 2
There’s my guide to the anatomy, but here’s some more tips that I’ve noted to myself that I’d like to include
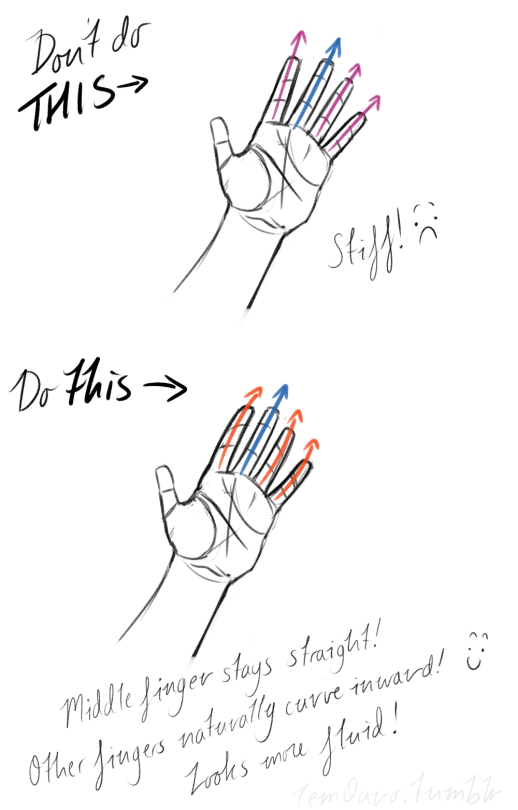
First off, I’d like to just note on the fingers: if you pay close attention to your own hand, you may notice the fingers are ever ever so slightly curved inward. It’s a very subtle detail, but I noticed that, despite how slight it is, it can make a hand look more lively, and less stiff.
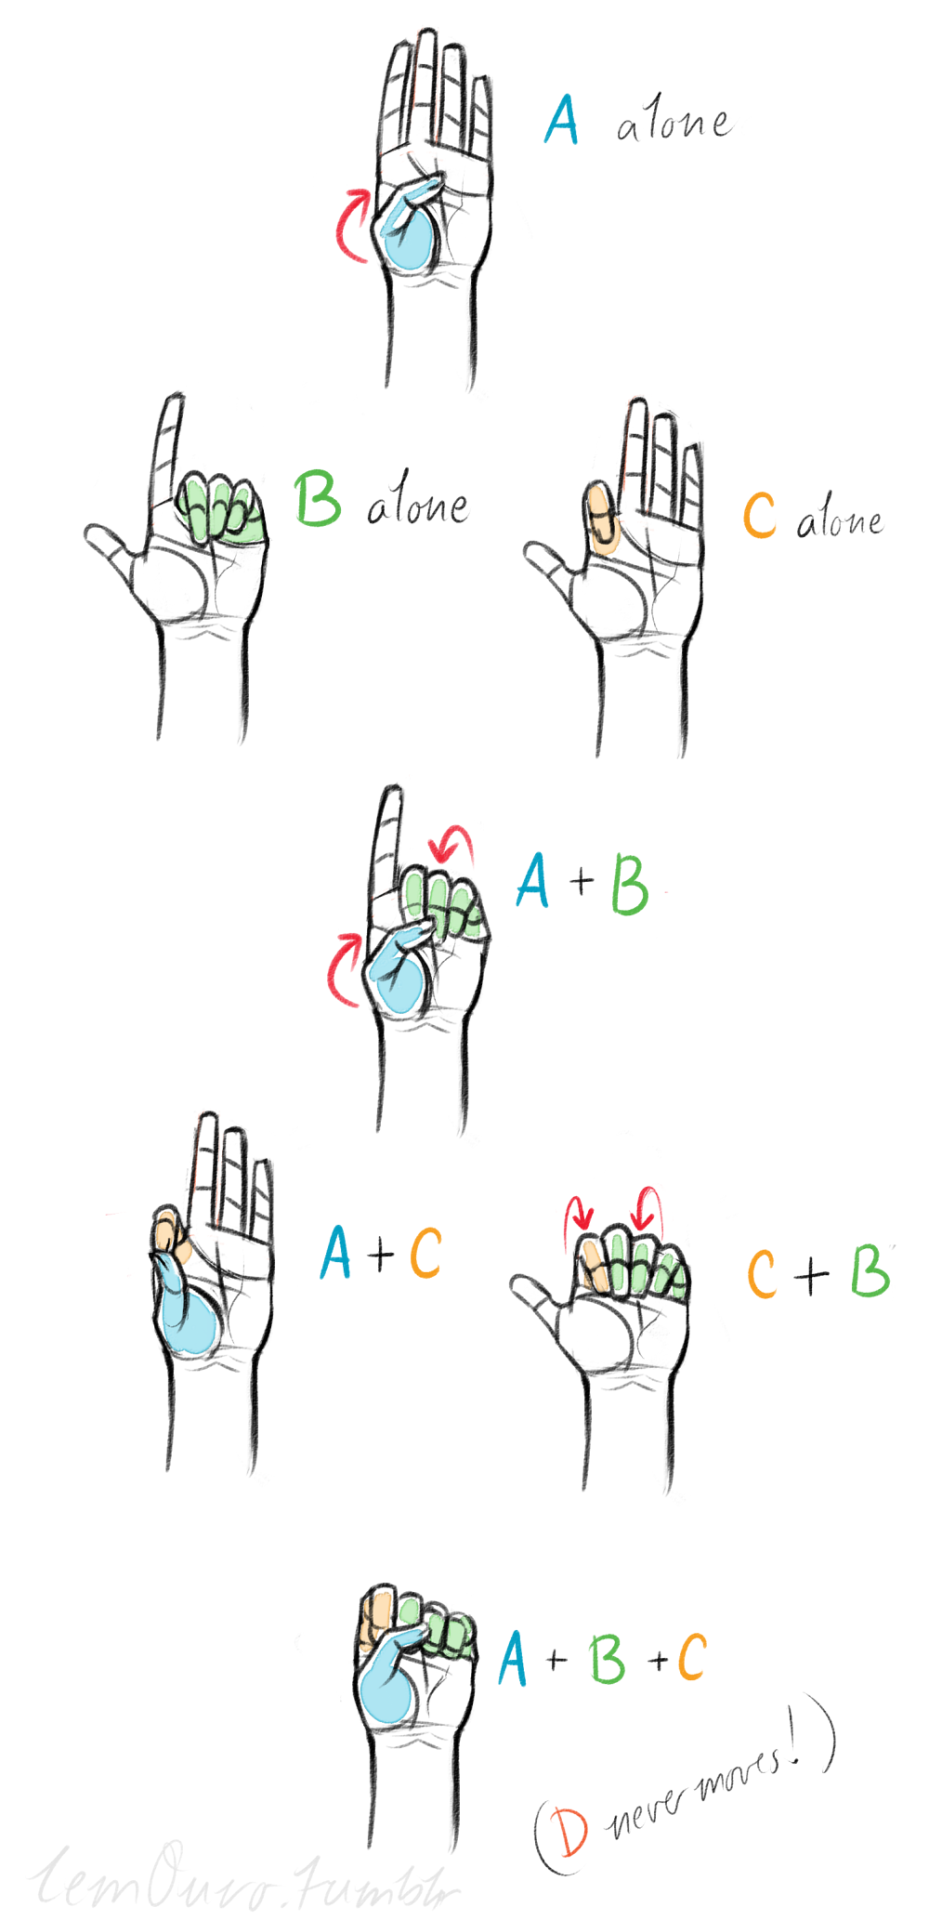
Second, the “M” on the palm! Your hand moves in many ways, and because it does it creates creases in your hand. The most prominent creases appear to make an M shape; this is handy to remember for what I’m going to talk about next. (It also could be a “W” I guess, or to be more specific a “ )X( “; just think of it in whatever way helps you remember!)

SO now that you see the M, draw your hand as a basic blocked shape and add your details. As you do, you can see that the M divides the palm into four basic parts!


When the hand moves, parts A, B, or C of the palm, alone or in different combos, will create the general poses that the hands do normally. These parts are the parts that move, with D being stationary, no matter what!
Here’s a chart of all the possible combos. Once you have down what part of the hand moves for a certain pose, you can change up the fingers and tweak it a bit to do what you need to make it more specific!
This is simply my method of drawing hands. God knows there are hundreds of tutorials out there by other artists, but personally, this way helps me the best (after learning the anatomy first).
This way I can divide the hand and combine the parts in any such way I need!
Hands take a lot of effort to grapple, and you need to practice them a lot, especially foreshortening of the hand; that’s really something you need to learn through your own studies. Look at your own hands, draw hands from life, from magazines, shows, comics; just draw hands! You’ll eventually figure out a method that works best for you. So to get better at drawing hands; draw hands!! And don’t stress over it, have fun with it!


Anatomy Tips by zephy.fr
Support the artist and follow them on Instagram!
-
 cre8ives liked this · 1 week ago
 -
 engineerdave liked this · 2 weeks ago
 -
 nintaendo reblogged this · 2 weeks ago
 -
nintaendo liked this · 2 weeks ago
-
 dochollibi liked this · 1 month ago
 -
 chocaiman liked this · 1 month ago
 -
 crabcasino liked this · 1 month ago
 -
 subject4a liked this · 1 month ago
 -
 velveteen-ghost liked this · 1 month ago
 -
 dreamworksoverdisney liked this · 1 month ago
 -
 hcmoeroticisms liked this · 2 months ago
 -
 carnalmantrap reblogged this · 3 months ago
 -
carnalmantrap liked this · 3 months ago
-
 mandalorianoranges liked this · 3 months ago
 -
 avg-v01d-artist reblogged this · 3 months ago
 -
 paxveritas liked this · 4 months ago
 -
 obdiian liked this · 4 months ago
 -
 groovydude21 reblogged this · 4 months ago
 -
groovydude21 liked this · 4 months ago
-
 lady-chainsaw reblogged this · 5 months ago
 -
 space-ace-24 liked this · 5 months ago
 -
 noblegasxenon liked this · 5 months ago
 -
 jumbledthemes reblogged this · 5 months ago
 -
jumbledthemes liked this · 5 months ago
-
 augustussinclairofficial reblogged this · 5 months ago
 -
 l0af-0 reblogged this · 5 months ago
 -
l0af-0 liked this · 5 months ago
-
 pasdetrois liked this · 5 months ago
 -
 agentofshar reblogged this · 6 months ago
 -
 bergamotdreams liked this · 6 months ago
 -
 dickmaster liked this · 8 months ago
 -
 senyor-taube liked this · 8 months ago
 -
 bunnyb0yy reblogged this · 8 months ago
 -
 kluskinoodles liked this · 9 months ago
 -
 lookinggoodinplaid liked this · 9 months ago
 -
 funnydudeguyman liked this · 9 months ago
 -
 thevampiremariusderomanus liked this · 10 months ago
 -
 robocide reblogged this · 10 months ago
 -
 blueghostiecreations liked this · 10 months ago
 -
 kuya-peikahh liked this · 10 months ago
 -
 nathanartifex liked this · 10 months ago
 -
 mamaru20028 liked this · 10 months ago
 -
 angellayercake liked this · 11 months ago
 -
 thrallhouse liked this · 11 months ago
 -
 blueeyedamethyst reblogged this · 11 months ago
 -
blueeyedamethyst liked this · 11 months ago
-
 mochabaybee liked this · 11 months ago
 -
 goddamnxanimals liked this · 11 months ago
 -
 luvukey liked this · 11 months ago

Sylwester | i will mostly post sketches, because i'm too lazy to end them
196 posts