Sylwester | i will mostly post sketches, because i'm too lazy to end them
196 posts
Latest Posts by nastysynth - Page 2
If you struggle drawing heads in different angles watch this!
OMG I found this video and it is a absolute goldmine! Its filmed by a Disney story board artist and they make drawing heads in any angle easy! now granted it takes practice to get this technique down but it soooooo helps.
The video below goes into deep details.


Some of you have been asking for a tutorial on how I draw faces so I threw together a thing for you. *finger guns*


SO I… spontaneously decided I really wanted to get into 3D stuff this year, and my dumb idiot brain IMMEDIATELY decided the best way to do this was to dive right into character modelling– right after designing something I obviously wouldn’t be able to make with my non-existent skill set!
–HOWEVER!!! I did take a solid week or two to read through manuals, watch zbrush and blender tutorials, etc… and managed to make (imo) a pretty decent bust! Sans shoulders! <:’^)

Beleth uh, ended up way different from her original concept HAHAHA… but I actually ended up liking her more this way! For now I’m content to leave her as is, though I’d like to go back when I’m more experienced with zbrush and give her an actual body.
I was wondering what's your process for creating plants? Specifically where you have to create leaves/flowers/branches out of a stem.
i really enjoy making flowers. basically, when i find one that looks fun to model, i’ll get a few photo references of real flowers, like this one from Home Depot’s website

so i can get a basic idea of their colors and shapes.
after that, i pretty much just make each component separately, one piece at a time. the stem, pistil, and stamen are essentially just long cylinders that widen and narrow at the ends, the leaves and petals start out as circles that i shape and alter over time, and then after coloring and detail work is done i move each separate model into place so that they start to resemble a complete flower


it’s kind of like putting a puzzle together, except you also make each of the pieces.
Made a quick tutorial about dynamic linking in Blender… It’s really useful for iterating designs that need to have the same changes as the original. One of my clients wanted me to try out many colors of models, but I wanted to make sure they all retained the same changes of the original, and this is how I figured out how to do it! Try it out if this is something you’d find useful!

i am SO sorry for the super long response, but i thought this might make a nice little tutorial opportunity, since soft body physics can be… frustrating, to say the least. i’ve noticed that it tends to respond better to spherical meshes than most others, so getting it to work with something with a lot of hard edges and flat planes can be a little tricky (at least in my experience).
so! to get started, here’s my basic setup

the only thing i’ve done so far is place my object in the scene, along with a plane to act as the ground and a camera to record everything.
next you want to select your object, and in the properties menu on the right, select the physics tab (should be the very last one, the icon looks like a bouncing ball)

and for your object, you want to apply a collision and a soft body modifier (some people use rigid body instead of collision, so if you have issues with one there’s a chance the other might work out better. as for me, i usually stick to collision)

then select your plane and apply the collision modifier only.
now when you hit the play button at the bottom of the screen, this happens

it’ll just kinda float in place.
so to fix that, you select the object, go back into the physics menu, and look at its soft body settings

now uncheck the box that says “Soft Body Goal” (this’ll let gravity do its thing)

now when you press play after that

poor dude just kinda dies.
so there are a couple things i like to do to help it not… do… whatever that is.
go back into your object’s soft body menu and click on the tab that says “Soft Body Edges”

now underneath where it says “Collision:” you want to make sure that you have either “Edge” or “Face” (or both, why not live a little) applied to the object (this can help prevent clipping!)

we’re trying to make it wiggle n’ jiggle while still maintaining its shape, so what usually works for me is to crank up the “Bending” spring as high as it’ll go (which is 10) and enabling “Stiff Quads”

and we’re left with this!

and that’s how i do it! there are probably more efficient ways to get this effect, but for me

so here’s my blender texturing guide! so many tutorial posts lately…
Czytaj dalej
Gradient Textures + Simple Ocean Simulation (Blender)
something that i like to do when im strapped for creativity is to open up Blender and make a little stylized ocean wave sim, like these


they’re super simple, nice to look at, and if you add in a little something extra, like a boat or some fish or even some particle effects, it can turn into something really special.
it also takes like three minutes to make, so let’s get started.
Czytaj dalej
Static Texture Tutorial (Blender 2.7)
So it’s been a hot minute since i’ve posted any tutorials on here, and one of my gifs featuring a static texture recently got a nice amount of attention on twitter, so i thought i’d post a tutorial on how to make an effect like this


in blender (blender 2.7 to be exact, i haven’t updated yet because i’m an old senior citizen set in their ways). This one’s super simple, it literally takes about 5 seconds, so let’s get started.
Czytaj dalej
Hey how did you do that line effect on your models? asking for a friend.
So for a simple outline the easiest thing to do is open up your properties window (which should be displayed by default on the rightmost side of the screen. It’s got all of your render and output info displayed) and go to the section marked “Post Processing”


Open it and check the box called “Edge.” This’ll give your model a nice little outline when you render it (you can change the color by clicking on the rectangular box underneath the threshold slider)


and that’s just a simple way to get the basic result.
NOW if you’d like something a little more dynamic-looking, like this

Then you’ll want to go back to the properties window and instead of clicking on “Post Processing,” click on the box marked “Freestyle” (it should be at the very bottom)

Now, at the top of the properties window, click on the “Render Layers” tab. It’s gonna look like a stack of photos, right next to tab with the camera on it.

Once you’ve clicked on that, scroll down to the very bottom of the window, and click on “Freestyle Line Style”

Once you’ve opened that up, click on the “Geometry” tab. This’ll let you alter the style of the line.

and now you can add your modifiers! There are a lot of different styles to choose from, so don’t be afraid to experiment with them! “Sinus Displacement” makes a sort of zigzag pattern, “Blueprint” adds in some fancy circles, and “Spatial Noise” or “Polygonization” will typically get you that sort of loose, sketchy look if that’s what you’re going for.


blender is pretty neat, huh!
3D Pixel Art Tutorial (Blender)
so here’s another little tutorial, this time on how to make quick and easy pixelated models in blender, like these


so lets get started!
Czytaj dalej


a few ppl asked a while ago how to do the glitchy texture effect n i never rlly gave a good answer so heres a small tutorial:
1. add a wave modifier first, make the height really small (like 0.1-0.2), turn the speed to 1 and the width to less than 0.4
2. add a subsurf second (sometimes u dont need this one though, its mostly to stop the face/eyes collapsing on low poly models)
3. add a decimate modifier last
Free to use textures, credit optional.


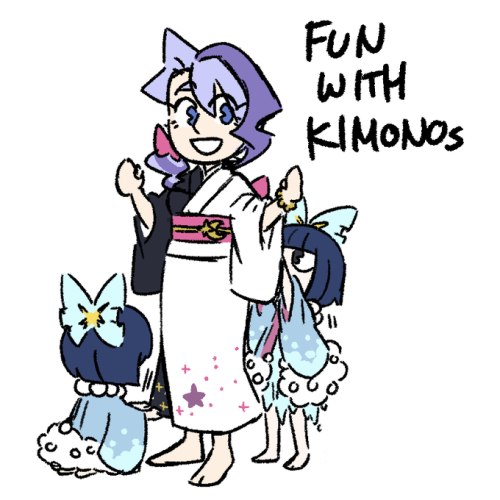
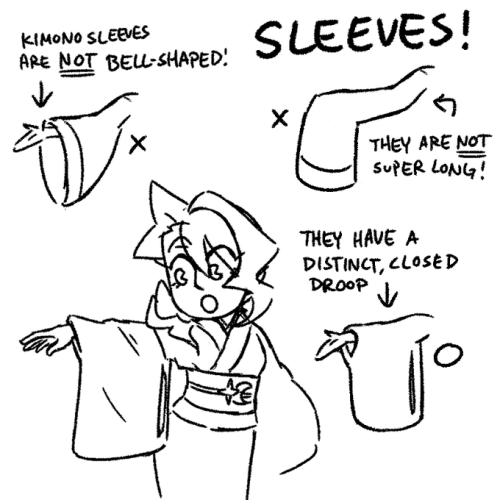
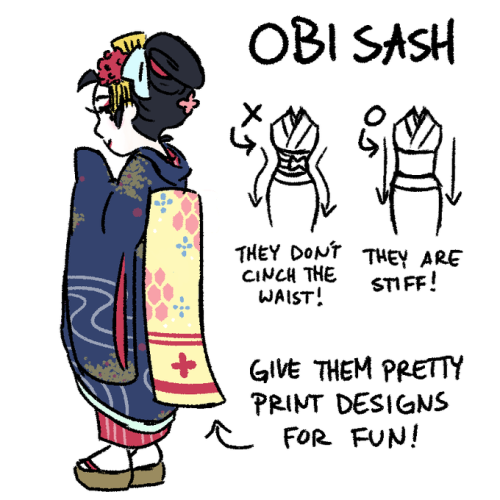
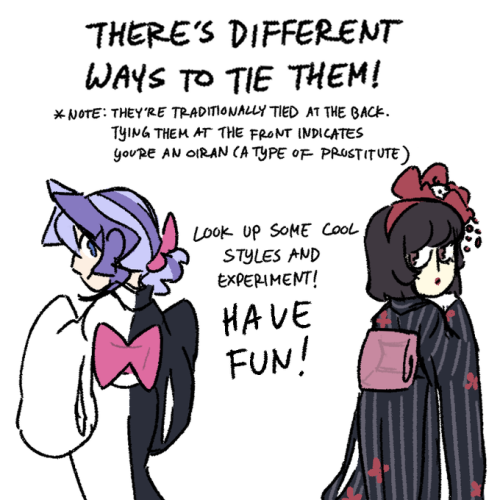
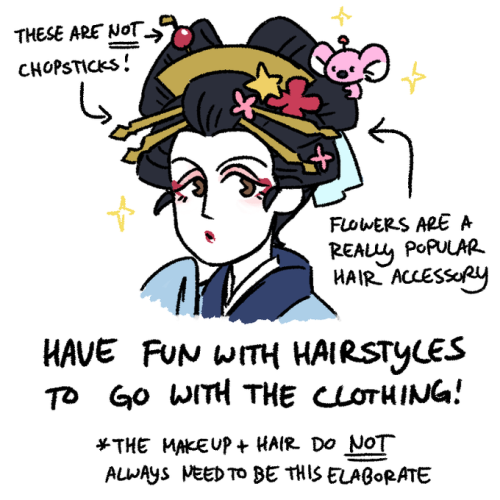
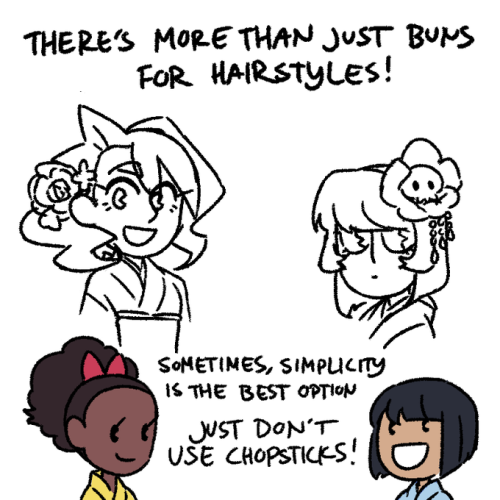
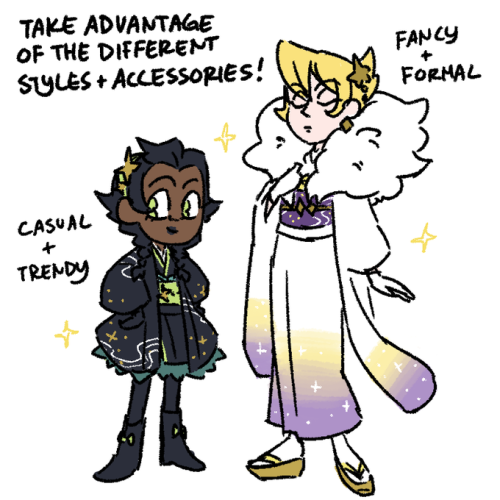
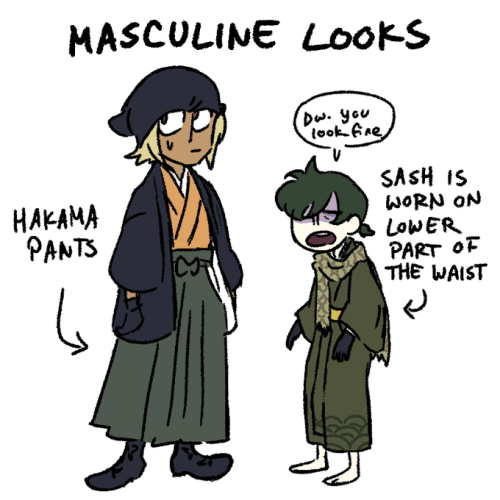
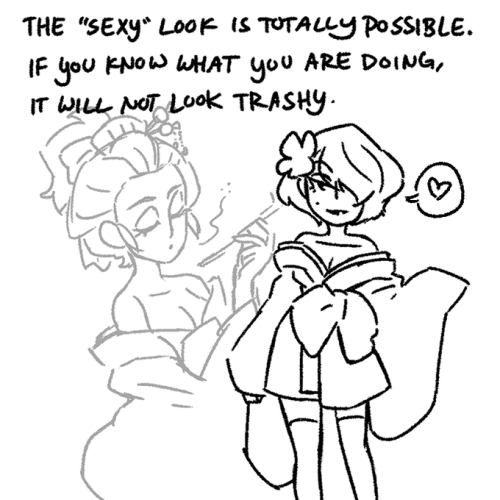
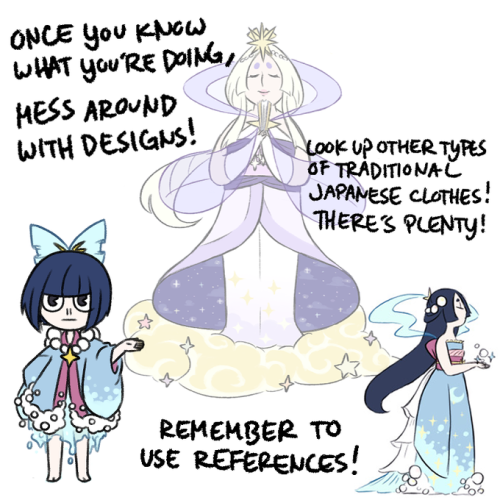
Little quick and light kimono tutorial because I’m noticing a trend of weird things non-Japanese people do with them.
Bathrobes =/= Kimonos
Kimonos aren’t sacred. They’re for everyone. Just practice drawing them, use tons of refs, be respectful, and have fun. There’s also tons of other types of traditional clothes you can mess around with. Research is your best friend


Hi here’s a mech tutorial
I use shitty pc builds and cars as references
More helpful art tips 2
* leads to a twitter thread Tutorials
Drawing a mountain with volume*
Painting the chest*
Color in Painting [Part 1][Part 2][Part 3]*
30+ lessons on drawing in perspective
Six types of fold when drawing drapery
Using references*
IMAG master classes (paid)
Planning values*
Reference
Knee Movements*
Kato Anatomy*
Making Products
A beginners guide to zines
Opening an online store [Part 1][Part2][Part 3]*
Studying Design for TV animation (on a budget)
Lighting in a room*
Windows
Bricks
Form rendering cheat sheet
Brushes
Drawmaevedraw brush set (ps)
Traditional Texture Brushes for Photoshop and Procreate (paid)
Other Resources:
Huge list of resources w/ a focus on getting into the animation industry.
Thread of study resources*
Resume guide (for an internship at nickelodeon)
Agents for Illustrators
Filing Taxes as a freelancer
3D art
Low poly horror in blender (paid)
Blending grass with the landscape (UE4)*
Ghibli Style trees in 3d (Blender)
Spritestack - a voxel editor suited for 2D artists.

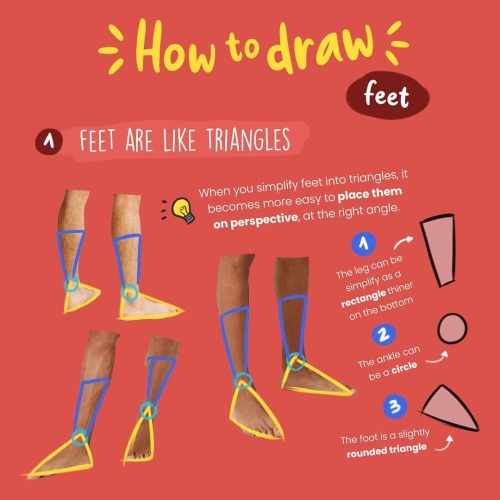
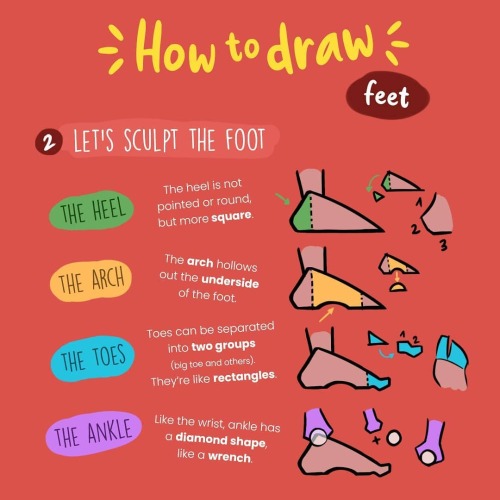


How to draw feet by zephy.fr
Support the artist and follow them on instagram!


Oh…Steve…
Metal tutorial
Fire tutorial


Seriously, where did Steve find that armor? I hope he didn’t steal it from an aggressive warrior or something…I don’t want him to get in trouble, ya know? It’s been a year since this tutorial is on Patreon, so I’ll post it for everyone now! (I have to work on a reptile scales or transparent materials tutorial one day tho)
Underwater tutorial: https://darhak.tumblr.com/post/642964456883765248/steve-why-is-he-always-like-this-metal-tutorial
Fire tutorial: https://darhak.tumblr.com/post/186828219798/thats-my-first-and-probably-not-last-art
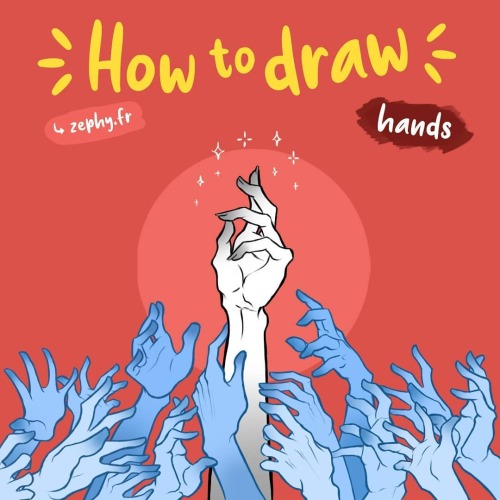
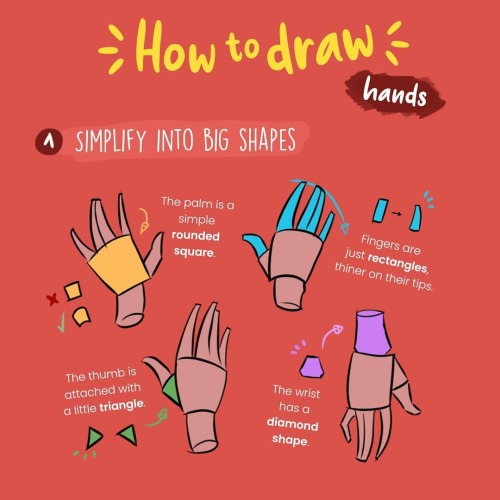
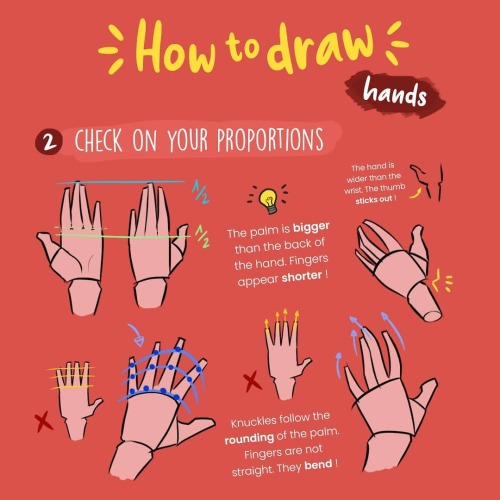
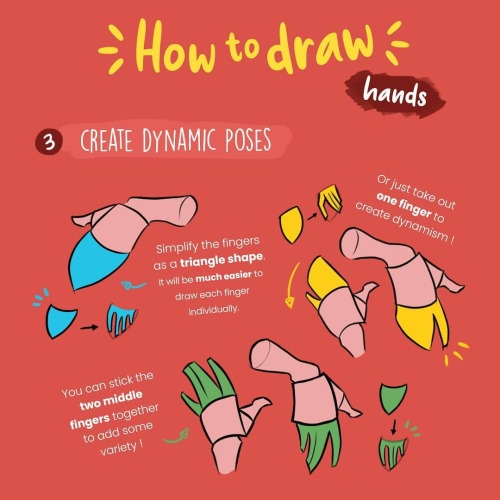

How to Draw Hands by zephy.fr
Support the artist and follow them on instagram!

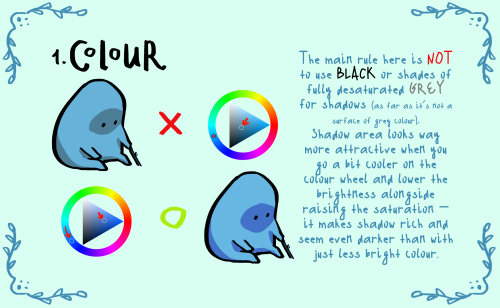

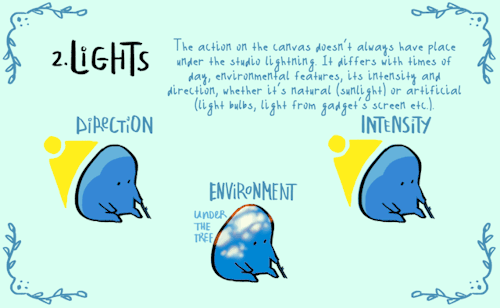

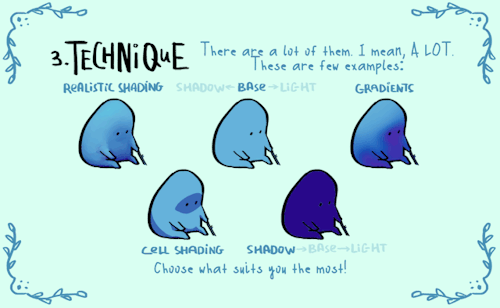

here comes small shading…tutorial? set of advises?? name it whatever you want. hope someone of y’all will find it at least a bit helpful!
special thanks to @cozy-capybara for literally inspiring me to make this thing


Anatomy Tips by zephy.fr
Support the artist and follow them on Instagram!
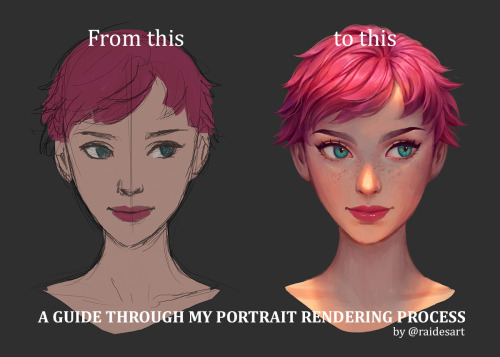
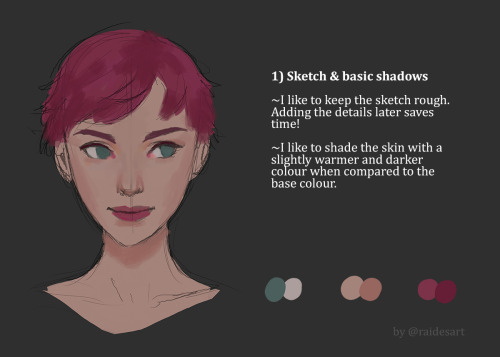
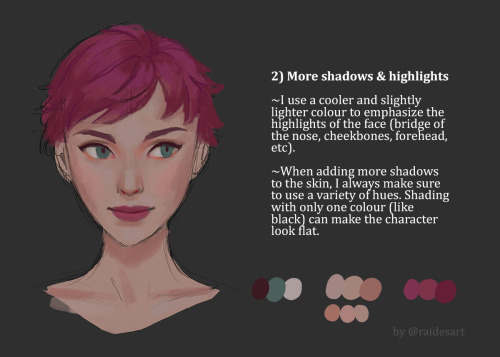
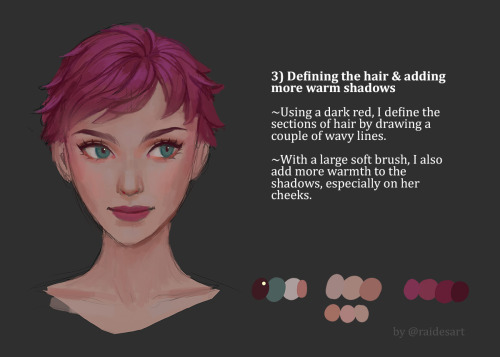
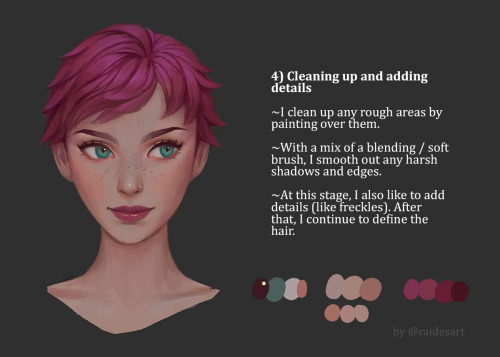
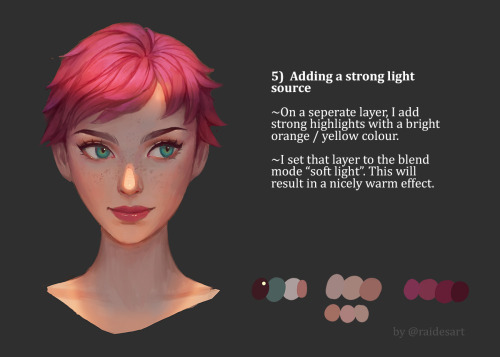
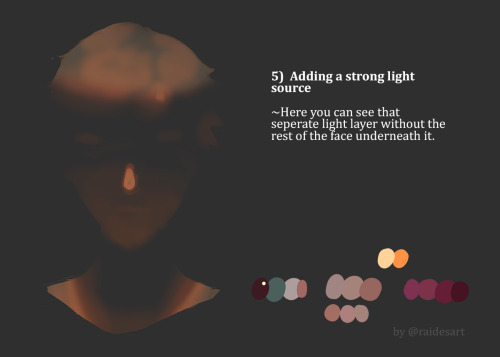
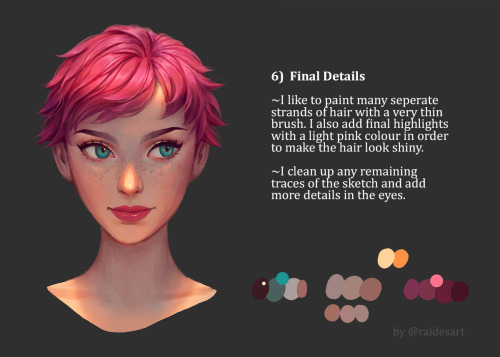
So many of you asked for a tutorial on how I paint faces/ add a light source, so here you go! 😍 Let me know if you guys have any feedback or if you want to try it yourself! 💜


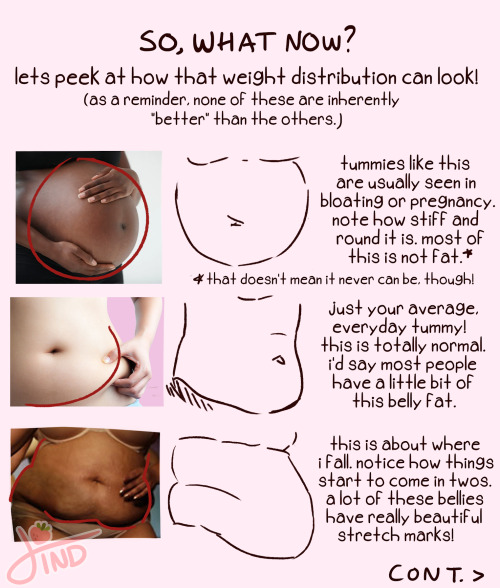


as requested- my zine about fat and plus size body types from instagram!💖 happy drawing everyone!
color blob effect in clip studio paint


hey! >this post< got a some attention and i saw a tag asking for the tutorial, so i decided to go through with it. here’s that tutorial!
tutorial below the cut!
Czytaj dalej
can you do a tutorial on how you color your artwork? it's so pretty!! 😍🤩
this is not the best and only way to color but personally i think it’s easy and quite effective for beginner artists who are practicing setting the mood for an artwork or laying out ground work for more detailed illustrations
I’m using Clip Studio Paint for this drawing.
Step 1: The base color

Use magic wand and bucket tool to lay out the base color, you can use different layers for each colors to be more precise, and it’s easier to change the colors later on. I use mainly warm tones for my base color because i prefer the look of it. Step 2: Coloring the lineart

Use a clipping layer above the lineart layer to do this step (there are other ways of course, you can search for them online) Color the lines that isn’t intersected with the background, the inner lines. Especially the skin part to reduce stiffness of the lineart, also help adding shadows.


I usually draw the darkest shadow areas with my lineart so i can color them at the same time.
Step 3: Adding shadow
Group the lineart + base color into 1 big group. Add a clipping layer above that group. Switch the layer mode to “Multiply”. Add the shadow area using a desaturated/grayish hue of your choice to set the mood for the drawing.
Example:
If the mood you want is more broody, use more cool tones (blue, purple,..)


If the mood is more festive or happy, use more warm tones


A drawing should consists both cool AND warm tones, other wise it would look dull. The second example has too much warm tones because the base color is already warm.
Step 4: Add filter layers/adjustment layers
This is where the magic happens. Enhance your art work by adding more Multiply and Overlay layers, set the mood as you like it to look, balancing the tones, play around. I wanted this particular drawing to have an overall cold feeling to it, so I added a blue multiply layer

Adding light with a beige overlay layer, using the airbrush with low opacity. This also help creating contrast between the shadow and light areas

But wait,,, it looks,,,,,, it looks too sad!! they are comforting each other after a terrible situation! Adam is not dead! I need another warm multiply layer!

There, it’s now finished. Quick tip: If your colors are looking off/doesn’t go well with each other, group everything and add a beige multiply layer on top! It would look better instantly! Learning color theory, color harmony also helps A LOT!! find tutorials and study from the masters! Good luck with your art, Anon!
LITERALLY the most Lynch thing i’ve seen